Baggy Butterflies

What a great idea to send your child to school with, or anywhere actually. You can even have your child help you decorate the wooden clothespins with markers or paint and then add the googly eyes and pipe cleaners. Fill each side with a little something special and clip in the middle. Would make a great surprise when your special someone opens their lunch bag and sees something special their child made for them also.  I do recommend that if you are to use a dry on one side and a wet on another, as you see pictured, that you might want to tie it tight with a rubber band to keep the moisture on one side so your dry goodies won’t get damp. Another idea is to use these are party favors.

Easter Ornament

Materials:

  • Creatology™ Chenille Stem
  • Foam Stickers – Shapes of Choice
  • Craft Smart® Paint Brush
  • Wooden Egg
  • FolkArt® Acrylic Paint – Titanium White
  • Aleene’s “Tacky” Glue®
  • Disposable Plate for Paint Palette
  • Recycled Newspaper (to protect work surface)
Instructions:
  1. Cover the work surface with newspaper.  Paint the egg with Titanium White. Let dry.
  2. Fold a chenille stem in half to find the center. Add a drop of glue to the center of the chenille stem and press onto the bottom center of the egg. Tightly stretch both sides of the stem around the egg and twist at the top. Repeat this step with another chenille stem on the opposite side of the first stem.
  3. Twist both chenille stems at the top of the egg to form hanger.
  4. Embellish each section of the egg with foam stickers as desired.

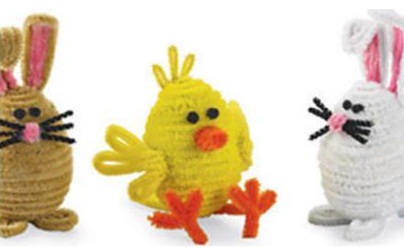
Easter Chenille Bunnies and Chick

Materials:

  • Ruler
  • Plastic Easter Egg
  • Creatology™ Chenille Stem
  • Creatology™ Pom Poms
  • Craft Smart® All Purpose Glue
  • Scissors
Instructions:
  1. For Chick:
  2. Wrap yellow chenille stems around plastic egg. Use craft glue to secure periodically while covering plastic egg. Cover completely.
  3. Cut three ¾” pieces of yellow chenille stems. Glue to top of egg to create hair as shown.
  4. Form three loops with a yellow chenille stem to form wings. Create two and glue into place.
  5. Glue two black mini pom poms to face.
  6. Form beak with orange chenille stem and glue into place.
  7. Form legs and feet with orange chenille stems and glue as shown.
  8. For Bunnies:
  9. Wrap white or tan chenille stems around plastic egg. Use craft glue to secure periodically while covering plastic egg. Cover completely.
  10. Form white or tan chenille stems into loops to create bunny ears. Loop pink chenille stem and glue to the inside of the ears.  Glue two ears onto bunny.
  11. Cut three 2″ pieces from a black chenille stem.  Glue onto face for whiskers. Glue pink pom pom in center as shown for nose.
  12. Form feet with white or tan chenille stems and glue as shown.
  13. Loosely coil a white chenille stem to the back to form tail. Glue into place.