Family Handprint Artwork

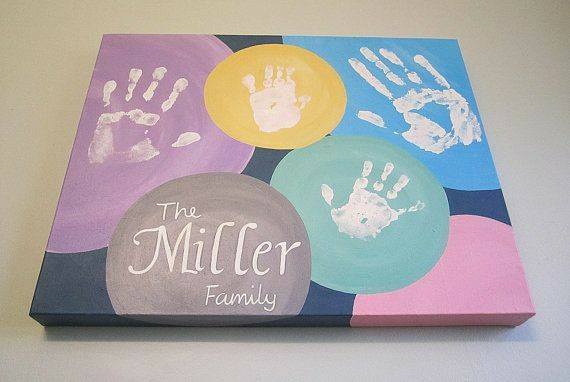
This is really great. A little work to plan it all out and this could be a great addition to your wall – and a sure conversation piece. First get a tracing of each persons hand and cut out. Lay them in a pattern on stretched canvas. How many colors will you need? Whats your background color? How do these colors co-ordinate with each other? .. with your home decor? Is it going to be a gift? Here the colors are painted – but you could cut circles from fabric, wall paper, construction paper. You could also place each persons name under hand print. I would also create a date.

DIY Rope Words

Very cool way to make names or signs – make it with rope! Its cheap and easy to do with this handy tutorial!

This is very easy to do and has a really visible impact.

Check out this link for more details: DIY Rope Words — craftbits.com

Foot Print Trucks & Cars

13124721_1193167650714046_1782349112918706708_nThese are so cool. So simple to make. Make the footprint like shown above and use construction paper, sharpie markers and paint to finish. These would make great gifts for the grandparents or extended families or decoration in a nursery. I really love the hand print and footprint creations so many come up with.

Footprint Sunshine Artwork

11350441_461246710701169_924371884150022376_nThis would make a great present for a Mom or Grandma – and the feet can be made with one from each household member – hands could also be used instead of feet. Lettering can be made with stencils and transfer letters and thick watercolor or finger paints should be used for the prints.

Dearly Departed Huggable Keepsake Pillow

10422086_825660567472891_5972936951547561527_nThe inevitable always happens and it is one of life’s most devastating and depressing things we must go through. I found this pillow idea made from a shirt that the receivers father wore when he was alive. The patch was made by embroidering by a local sewing shop for not very much. The pillow would be easy to do by turning the shirt inside out sewing a square (sew just three sides) that ends between the collar, start of the sleeves and the bottom. Trim excess off. I would consider triple stitching it to ensure durability – it probably will get a lot of use. To stuff use stuffing bought by the bag or size the square to an old pillow to re-purpose. The shirt shown would need the bottom seam sewed down. I would leave the pockets useable so little keepsakes could be added to make the pillow feel even more like being close to the departed one. The patch would then need to be sewn on. Carefully hand stitch the remaining side after turning shirt right side out.