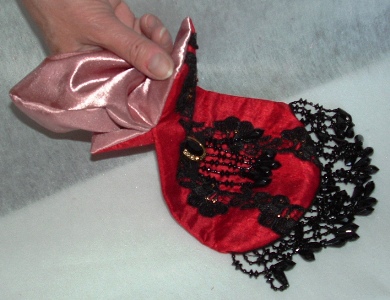
 If you have a bit of sewing expertise, this is a great way to have a lovely Victorian style purse for your Victorian Costume that you can be sure no one else will have. This is also a great opportunity to have a purse that matches (or coordinates perfectly) with your custom Victorian costume outfit. There are many steps, but each one is simple, so don’t be intimidated and you will be rewarded with a one of a kind accessory that is your very own!
Gather Materials You will need the following items for your Victorian purse:
~Purse Frame; New or used.
~There are many lovely Victorian style frames available as reproductions. You might already have a Victorian frame from an old, authentic Victorian purse that you would like to use. If the frame has been “crimped” onto the fabric, you might be able to carefully pry the edges of the frame apart, and reuse it. However, a better choice is a frame with either tiny holes to which you can sew the purse body, or a frame with hardware that screws onto the inside of the frame to secure the fabric.
Fashion Fabric:
This is name for the material that will show on the outside of your purse when you are finished. You should consider using natural fiber fabric like cotton, linen, wool or silk, since these are period-correct choices. This might also be a bit of fabric left over from an outfit you have already made for yourself, or that a seamstress has made for you. Be sure to tell your seamstress ahead of time if you would like to have her save the scraps. You will need just a small amount (about a yard) of fabric… perhaps a bit more if the fabric is patterned since you may want to center the pattern (both front and back) on the finished purse.
Lining Fabric:
This is the fabric you will see when you open your purse. Again, it is a good idea to stick with natural fabrics to be correct, but since almost no one will see the inside of your Victorian purse, the choice is up to you. I often like to use something shiny, like a crepe-backed satin.
Embellishments:
Here’s your opportunity to indulge your creative side! You can use beads, braid, lace, embroidery, fringe, ribbon, or whatever else you desire on your Victorian purse. The surface area will be relatively small, so you can take the time to decorate the purse in whatever way you fancy. Tiny ribbon flowers, embroidery, millinery flowers, or silk flowers will work as well. Remember, those Victorians were wonderful at all sorts of “fancywork” involving a needle and thread. You will want to keep your embellishments at least a half-inch away from the edge of your piece, since this area is your seam line. My preference is to sew on embellishments. Please resist the urge to use glue or hot glue on your purse! Glue is not period-correct for this kind of project, and will also not allow the fabric to move with use and could come loose over time, stiffen the fabric or stain. If, after you have sewn down all of your embellishments as firmly as possible and something is still hanging loose, then use a tiny dab of glue just to secure only that tiny bit.
Interfacing:
I like to use heavy-duty interfacing. Either sew-in or iron-on… your choice. Once the interfacing is applied to the fashion fabric, you will have a nice sturdy base for your embellishments. Also, your purse will hold its shape and not be “floppy” when you are done.
Making the Pattern:
Making your own pattern is not as intimidating as it might sound. All you need is the purse frame, and a pen.
Lay the purse frame upon a piece of paper, and carefully trace around the outside edge of the frame. Let’s call this the “frame line.” Make a -.- mark on either side of the frame to indicate the point where the hinge is located.
Next, draw a new line about 1/2″ to 1 inch out from the frame line (This will be your cutting line) and extend it down from the purse frame area to define the shape of your finished purse. You will want to angle away from the purse frame slightly to widen bottom, starting at the top corner as you go toward the bottom of the purse. The wider the angle, the more fullness the finished purse will have. Mark the pattern edge with a notch at the point where the hinge line falls.
Use this pattern to cut out 2 pieces each of your fashion fabric, interfacing and innerlining, being sure to notch the fabric on either side where you made the dash marks earlier for the purse hinges. Sew or iron the interfacing to the wrong side of your fashion fabric.Embellish the front (and optionally the back) of your purse in whatever way pleases you. If you have decided to add a fringe, this will be added after you are done with any surface embellishments. (Remember not to embellish into your seam allowance at the edges, except when you want to catch the ends of Victorian style lace or other trim into the finished seam.) Don’t worry about how the back of your work looks. This will be covered later by the lining. Optional Fringe. You may choose to add a fringe or ruffle all the way around your purse or just at the bottom edge. The application is the same in either case. Pin or baste the top edge of the fringe to the right side of the front at the outside edge of your purse, so that the fringe points “in” (up) toward the body of the purse. Pin the fringe (or try a small amount of low stick masking tape being careful not to touch fabric) if necessary, so that no beaded fringe wants to fall into the seam as you sew. Lining – With right sides together, pin and then sew the lining pieces together. Start at the notch on one side and sew to the bottom of the purse. Leave a gap about two inches long in the seam at the bottom of the purse, and then continue the seam up the other side to the notch. Leave the top edges above the notch open. Clip any curves or corners, if necessary. Clip the notches until they meet the end of your sewing line. Do not turn the lining right side out.
Fashion fabric – With right sides together, pin and then sew the fashion fabric front and back together, starting at the notch on one side, sewing down around the bottom of the purse, and back up the other side as far as the notch. Leave the top edge above the notches open.
Clip any curves and corners as necessary. Clip the notches until they meet the end of your sewing line. Turn the purse right side out, and carefully press it flat, you can use an iron if the embellishment permits. The top edge that you left open should now be fairly flat, with the seam edge above the notches completely free, since you clipped the notch to the seam line.
Slide the lining over the purse (so that the right side of the lining and the right side of the purse are facing) until the notches in the lining match the notches in the purse fabric. Pin the top edge of the lining to the top edge of the purse on either side.
Sew the top edges of the purse and lining together, from notch to notch, being careful to stop exactly at the notch, and not sew past it into the purse body. Clip curves or corners. Carefully pull the purse body through the gap at the bottom of the lining. Push your fingers into the top edges of the purse to ensure that the lining and fashion fabric seam is turned out all the way. Press the seam gently to ensure it stays flat.
Carefully stitch the open gap at the bottom edge of the lining to be closed, then tuck the inner lining down inside the purse. Your purse should now have no raw edges anywhere. Your purse is now ready to attach to your Victorian frame.
Attach the purse to the frame.
Crimp Frame- Push the top edge of the purse into the frame, being careful to center the fabric into the frame. The bottom edge of the opening should line up with the hinge on either side of the frame. Crimp the frame closed to secure the fabric.
Sew-in Frame- Being careful to center the fabric in the frame, push the fabric as close to the top edge of the frame as possible. Carefully sew the purse to the frame using a thread that will blend, and making tiny stitches.
Hardware Frame- There will usually be several posts that extend from the inside of the frame where the inside hardware will be screwed in to secure it. Place the inside hardware piece at the top edge of the fabric, and mark the location of each post by marking through the holes in the hardware. Next, use a punch or an awl to open a hole in the fabric so that it will fit over the posts on both sides of the purse frame. Now replace the fabric in the frame and push the posts through the holes you have made. When the fabric is in place, use the screws provided to secure the inside hardware to the frame. This makes a neat, durable finish for the inside of your Victorian style purse.
Attach a chain to your Victorian purse, and you are done. Enjoy your new purse!


If you like this post and want to share it then click the service!


