Repurpose A Broken Watch

watch watches picture pictures victorian old antique not working

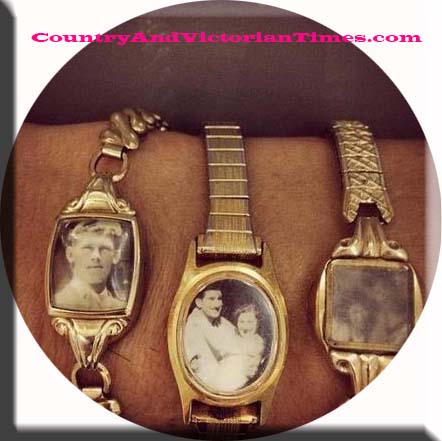
What a great idea for that broken watch sitting in your drawer with no purpose other then you don’t want to get rid of it because of sentimental value. Here is a great solution – replace the watch and dials with a photo of a departed loved one or from a special occasion. You can also get rid of the watch battery to make the new bracelet a little bit lighter. You should be able to remove the watch back with a little bit of prying from a tiny flat headed screwdriver. Remove the hands and face of the watch and use the watch face as a templet for your picture. Glue down with instant glue or use mod podge to seal well. Replace back and now you have a great piece of jewelry and have given repurpose to a watch that now you do not have to throw away. It does have a sense of Victoriana about it when completed.

Photo Planting Pot For Gift/Centerpiece

537905_625561024140656_1372078231_nThis is a great idea for Mother’s Day – Wedding Centerpieces=

Print on plain paper a series of photos of  the Mother’s children or Grandmother’s Grandchildren is sizes ranging from 3×5 to 4×6. You must use regular paper for this project as photos or photo paper won’t mold well to the contour of the pot. Use Mod Podge and brush a coat over the area where your picture is to go and press firmly onto the pot. Use a dry brush to work any wrinkles out that form and then continue until pot  is covered. When pot has been given ample time to dry, brush a thin layer of Mod Podge over all the photos getting it into the crevices made from the over lapped photos. Let dry. You can then seal the entire pot with a coat of acrylic spray. Also, think about painting your pot first to give it a new clean appearance. I still recommend using a liner inside the pot – or you could use a thick plastic in the pot before planting. You wouldn’t want such a special gift to be ruined over time would you? You could print the photos as black and white or you could just use color. But test Mod Podge on the color to see if bleeding will occur. If it does spray a coat of fixative or acrylic spray on photos before attaching to your pot. Would be great also as centerpieces for a wedding on each table with pictures of the couple during their relationship.

Outdoor Drink Holder From A Can

543708_429619690467194_251061827_nThoroughly clean can and dry — Paint or decoupage the outside of can with a unique design — Seal with polyurethane — You will need a (minimum size of) 18 inch galvanized bolt (about 2.50 at a hardware store) with a washer and nut. Puncture hole in bottom of can and push the bolt through from the inside of can until head in at the bottom. Under the can on the bolt add a washer and then secure the nut tightly. The longer bolt you use the better. You can also polyurethane the entire can, nut, washer and bolt once done to give a nice shiny presentation and to help prevent rust.

Tree Limb Coasters

This is a great idea and would make a great present for that special someone. Saw 1″ slices from a limb on band saw or circular table saw. It is important to make sure they are level from one side to another because if you did not have a level coaster a drink placed on it would in turn would not be leveled. Coat heavily with a gel stain and make sure it gets into all the nooks and crannies and then wipe off and let dry. When dry use polyurethane and make sure to get any bark also which will make the bark more durable with the wood. Let dry. You can leave this project alone at this point or here are some additional things you can do:

*Center a picture or child’s drawing to one side and decoupage it leaving one side alone so you can enjoy the wood

*Cover one side with a nicely colored felt to help protect from scratches to furniture

Spruce Up Your Mouse Pad

Just in time for that rainy day… one of many that approach several areas of the country… a simple little craft that will brighten up and personalize a place you never thought of doing.

Use a scrap piece of fabric or get one ready to go for the next rainy day! It needs to be slightly larger then the mouse pad.

You will also need an spray can of all purpose glue and a sharp pair of fabric scissors.

When you are ready simply spray the underside of fabric and top of mouse pad…. lay fabric top up on mouse pad. Use a ruler of pencil to roll the folds off the edges. Let dry for recommended time on can.

Then trim the edges to fit the shape of the mouse perfectly. When done use fray check (fray stopping glue) around edges.

Your done…. you spruced up an old mouse pad and personalized it to fit your personality. Now try another (even if you have to buy a cheap mouse pad) for a friend!

Enjoy!