Garden Pot Tower

pot recycle terra cotta birdbath plants flowers gardenItems Needed:

Garden stake 4′ tall

5 small Terra Cotta pots

1 large thick plastic dish

Small plants/Flowers

Garden soil

Directions:

Hammer the plant stake into the ground and make sure it is secure because it will need to hold a lot of weight. Place the first pot onto the stake and have it go even onto the ground. Fill with dirt. Next pot goes on but this time let it lean to one side. Fill with dirt. Next pot goes on and tilt o opposite side and then fill with dirt. Do that for the last pot as well except this time you fill with gravel and balance the plastic bowl onto the top and fill with water. Once this is done and the pots are filled it is very very sturdy. Plant small flowers and plants in your pots and appreciate how simple this is to make. It will be a nice addition to your garden. You can paint your pots with vivid colors also to add even more design. If you choose you can “goop” glue your plastic bowl onto the top but the gravel does need to go in first as the weight of this is what keeps the whole thing nice and tight.
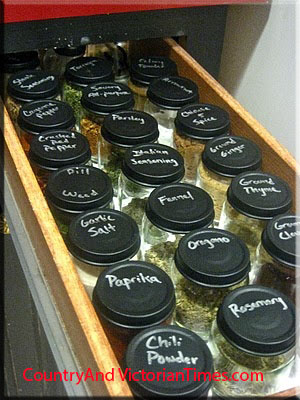


Recycle Baby Food Jars Into Storage Containers

baby food jar chalk board paint herb seasonings store repurpose upcycle recycleWhen you use contents of baby food jar clean completely and dry. Paint the lids with two layers of chalkboard paint. Now you can use a top drawer and have your spices more easily available to you. Don’t stop at spices – what about all of your findings, sewing notions etc.? Would be great for your excess office supplies too like paper clips, rubber bands, staples.

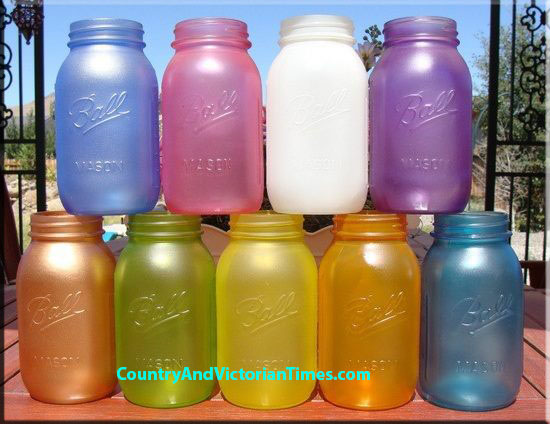
Paint Glass Different Colors

420610_625983630765062_442155601_nMix a clear white paint with fabric dye/food coloring until you get desired color. Paint the outside of the glass and let dry. You should have a nice color and you can seal that with varnish or polyurethane to prevent it from peeling. Use to store food products (stored in zip lock bags) in the kitchen, craft items, office supplies in the office, seeds for your garden etc. Do not use these by directly putting food inside of them for your protection. You could paint the bottoms one color and when dry paint the tops another color letting them drip down. I think this being done to a larger size container could be used as a centerpiece for a wedding since you could color co-ordinate them with different color schemes. You can do this with recycled items or it would really bring a dollar store vase up a notch… and don’t stop at glass – you can do this same process with plastic.

New Safer Way To Remove Ticks

tickA nurse discovered a safe, easy way to remove ticks where they automatically withdraw themselves when you follow her simple instructions. Read this one as it could save you from some major problems.

Spring is here and the ticks will soon be showing their heads. Here is a good way to get them off you, your children, or your pets. Give it a try.

A school nurse has written the info below–good enough to share–and it really works!

“I had a pediatrician tell me what she believes is the best way to remove a tick. This is great because it works in  those places where it’s sometimes difficult to get to with tweezers: between toes, in the middle of a head full of  dark hair, etc.”

“Apply a glob of liquid soap to a cotton ball. Cover the tick with the soap-soaked cotton ball and swab it for a few seconds (15-20); the tick will come out on its own and be stuck to the cotton ball when you lift it away.

This technique has worked every time I’ve used it (and that was frequently), and it’s much less traumatic
for the patient and easier for me..”

Also, if you just pull a tick off, their heads sometimes break off and are left under the skin so this is much safer. Be aware also that a tick with a white speck on its back is a Deer Tick, these can cause Tick Fever so check yourself and your family good if you see any of these!

Penny Mosaic Kitchen Floor

923132_133715350150574_1162917559_nI think this idea for a floor covering is fantastic. Pennies are placed heads up with a ‘goop’ glue to the floor. When all placed and ‘goop’ is completely dry a varnish was poured onto the pennies in several small layers until the varnish was a layer above the pennies and you can not feel the edges of the pennies. This took a lot of time to do and the installation artists did a great job. I do think it is illegal to destroy or otherwise make currency useless so before using any type of cash in your craft/art project please look into the legality of it. I really like how they used old and new. Don’t think because they used pennies that this was cheap. This floor costs hundreds of dollars by the time they were through. Looks amazing – but I would hate to see anyone in the future want to reno it and do something different. It would be a lot of work.