Creative Patterns Of Roman Blinds To Complement & Update Your Home Décor By Jason Phillips

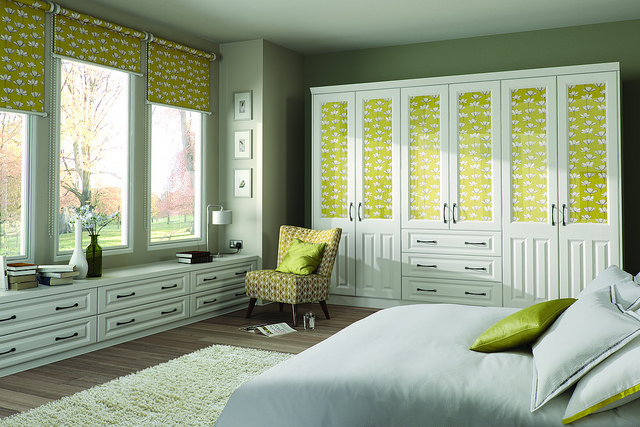
Roman blinds are a design classic – often neater than curtains, and simple, clean and effective. Of course, it’s always easy to fall into the trap of assuming they’re dull, but that’s just because you’re not looking in the right places! Roman blinds are incredibly versatile, and there are tons of creative patterns out there that you can use to complement and update your home decor.

Go Bold

Think big, bold and bright. If you’re finding your room a little dull – perhaps it’s cream, beige or a lovely shade of grey – add some wow in by picking some big bold patterned blinds. Think modern art and geometric patterns. Whether it’s vibrant reds, electric blues or hot pinks, adding a splash of color to your blinds is a great way to bring color into a room without having to repaint the walls. Don’t worry about it clashing either – as long as you’re careful, clashing colors can be just as fun as matching ones. Try this color wheel for which colors you can pair together safely as opposites.
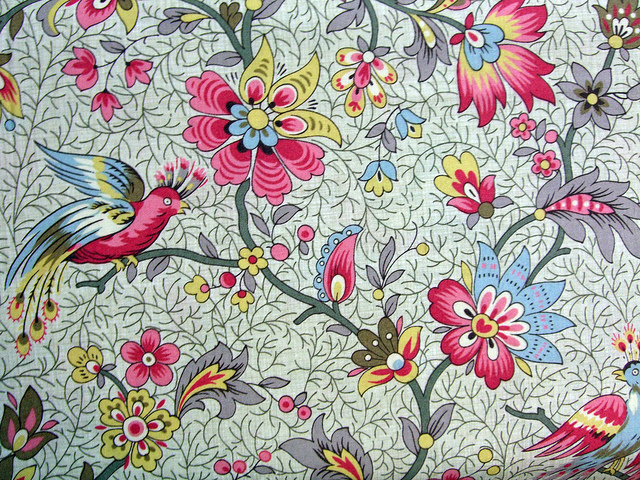
Think Floral

If you’re after a cosy, quaint look, go for a classic floral. Whether it’s tiny little flowers dotted across a pastel background, or big, blocky roses, a good floral is great for adding a homey feel to your room. If you’ve got a particularly large window, you could even get one of the on-trend patterns with some birds worked in too – but be careful with smaller spaces, because you don’t want too heavy a pattern.

1

Travel Time

If you’re the kind of person who loves to travel – or even just loves the idea of it – why not pick something along those lines? Old-world style maps are in fashion at the moment, and instead of trying to find space for a print of one, why not make use of that blind space you’ve got? Or, for the more modern-thinking among you, go for something particular – whether it’s a map of the world, one continent or even one city. If you can’t find blinds with the map you want in style, it’s always worth seeing if you can get the fabric printed – or for the particularly brave, try it yourself!

Cutesy

Cute isn’t just for kids. If you want elephants following each other trunk-to-tail, pink owls sitting in trees or dinosaurs stomping around, then go for it! Adding some whimsy to your room can add a hint of quirky fun. This is especially good for home offices, or other spaces where you’re starting to feel a little bit too grown up. After all, the only difference between the children’s range and the adult’s range of made to measure blinds is the name – so just ignore it!

2

Stripes

You can’t go wrong with stripes. If you liked the sounds of bold colors, but are a bit nervous about having the whole roman blinds that shade, then why not work it in in stripe form? Whether it’s ombre, a gradient or even just harmonious color, stripes let you play around with bright shades without the risk of it becoming too much for the eye. Vertical or horizontal can both work, though we recommend vertical if you want the window to look taller, and horizontal for wider.

Faux-Wood

If you like the idea of wooden blinds, but prefers the practicality of fabric roman blinds, then why not go for faux-wood style? Enjoy the benefits of blackout fabric and the ease of opening/closing them, with the great aesthetic of wood. From deep mahoganies to fine bamboo, there’s a print out there for everyone.

3

If none of these appeal to you, you can always DIY things! If you’re especially sure in your sewing skills, take some plain blinds and jazz them up – and if you’re not, you’ll be able to find someone in your area who can. This way you can pick exactly what you want – whether it’s cheeky unicorn print fabrics, classy brocades or even an elegant Japanese silk, you’ll be able to find a fun and creative print to match your decor. You could even get some fabric paint and go to town with a design all of your own invention!

Easy Budget Bathroom Storage By Rida Maqbool

Not everyone can afford homes that come with a lot of storage space. Typically, bathrooms are very small and you have to be really creative to find ways to store your things. The best thing about functional storage ideas is the fact that they don’t require you to spend a lot. So if you are looking for some fun and easy ways to help you make the most of your small bathroom, I advise you to read on.

1. Floating storage
Floating storage comes in handy when you have a small space and you want to make the most of it. For this you need to mount shelves to the wall of the bathroom, and put as much as stuff as you can on it without making it look cluttered. Not only is this tip, space saving but it is also very affordable. You can also attach wooden crates or buckets to the wall. Be sure to attach generous amount of nails so that the crate doesn’t fall off. Using walls for storage purposes is borderline genius.

1Photo credits: custom-contracting.com

2. Décor turned storage
Use decoration pieces that you have in your bathroom to store things. For example if you have a vintage box in your bathroom, you can use it to store your rings, earrings or bracelets. You can also use decorative trays to organize the essentials you need for shower, like shampoo, conditioner or body wash.

3. Borrow it from the kitchen
There are a lot of things in the kitchen that can be used in your bathroom to save space. A simple example of this is spice racks. Spice racks are perfect to store shampoos, conditioners, hairdryers and straighteners. Like I said earlier, using walls for storage purposes is simply a really good idea for saving space and using your small bathroom space wisely.

4. Hair dryer and straightener holder
An inexpensive hair dryer and straightener holder can be easily bought from your local store. With the help of these holders you are able to hang your hair dryer, flat iron and curling rod on the inside of your cabinet door. As these hair styling tools are typically the largest items in a bathroom, this tip will really come in handy.

5. Drawers inside your cabinet
If you have a hard time organizing your things then having drawers inside your cabinet is a great way to make complete use of your cabinets and find everything easily. You can easily buy these drawers from any store as they’ve gotten really popular among people.

6. Three tier DIY bathroom organizer
Buy reflective trays and stands from your nearest dollar store and turn them into a three tier bathroom supplies organizer. From hair pins to rings, you can pretty much place anything on this organizer. This way you’ll have easy access to things that you need the most when you’re in the bathroom.

2Photo credits: www.thiscasita.com

Author Bio: This article was written by Rida Maqbool. She loves interior designing, home décor and art & craft. She blogs at thecanvasprints.co.uk.

Wall Glazing Tips and Tricks by Ella Andrews

Wall Glazing Tips and TricksIf you are in need of redoing and reworking your walls, then you may want to invest in something a bit more sturdy and long-term than wallpaper or a simple paint job. Paint jobs may look nice, but you can go one step beyond that by glazing the walls. If you do things right, you won’t have to deal with any problems with your walls for a long time, making the room both beautiful and sturdy. Follow these steps to get things started:

• The first and most important step is finding the right tools. Since glazing is essentially a type of painting, you will need to get all paraphernalia connected to the job. The difference being however is that you will need a ruler, a squeegee and a neutral glazing medium. You must make sure you have enough of the medium to get the job done. When you’re buying paint you should make sure you get semi-gloss paint instead of full gloss.

• The next step lies in the preparation of the room. You shouest, writer, ld place painters tape on the trim, the light switches as well as windows so you won’t make a mess during the process of painting. Remove any and all furniture pieces you can remove from the room as well as other things such as electronics and any pieces of art. Place drop cloths around the flooring and furniture remaining if you can’t remove it.Wall Glazing Tips and Tricks3

• You should adjust your tools according to the job at hand. Before you start work, you will need to check the squeegee so you can get the distances right. You can do that by cutting a few shallow notches that show you lengths in inches on the surface.

• Up next comes the actual job of painting the room. You should do that like any other paint job, however using the lightest color as a base coat. You can get things done fastest with a paint roller, however you will also need good paint brushes as they will be needed for the trim and other sensitive areas. You should allow each coat of paint to dry before you apply the next one, as this will allow you to get the job done right.

• Step number five is making the glaze you’ll be using up next. You will need to mix your glazing medium with a darker color paint in a 4:1 ratio. Pour the glaze you just mixed in a painting tray and begin painting the walls with it, using a foam-based paint roller. You can use a hand brush to cut into difficult areas once again like before.

Wall Glazing Tips and Tricks2• Up next comes combing, which can be done by running the squeegee on the wall in curved strokes. This will have to be done while the paint is still wet, so you may need more than just one pair of hands to get the job done before its all over.

• The last step is to allow the paint to dry completely and over the course of at least a day before you remove the painter’s tape. Once that is done you will have a nice, brand new glazed room to enjoy at your leisure.

For more tips, visit: Kensington removal van

Red, White and Blue Wreath

972155_482585565147922_1440769029_nDo you love this wreath? Create it yourself with little time or money. This is made from a small/medium grape vine wreath purchased at your local craft store. You will need a small American flag and a variety of red, white and blue flowers in various sizes. Insert stem of your first flower into the grape vine and pull and tuck the stem in the back. Continue doing this with colors as you move around the wreath. You can permanently affix the flowers with florist wire in the back. Finally stick your flag in and hang.

Halloween Pumpkin Candle Holders Made From Oranges

Use fall leaves and twigs to landscape a backdrop for a group of unique candle holders. Elevate some of the oranges on boxes and urns for height variation.


This Halloween, scare up a batch of bewitching little candle holders to add a ghostly glow to a table or mantel. Made from oranges, these little jack-o’-lanterns are so small that you can use them in multiples for big impact. To create a seasonal centerpiece, cluster them among leaves on a platter or cake stand or simply use individual candle holders to mark place settings at a Halloween supper.

It lakes just minutes to make each one. First. cut a slice from the top of an orange, and scoop out the contents, saving the fruit for cooking or a salad. Cut out spooky eyes, a nose, and mouth from each orange with a craft knife. For the candles, use tea lights, the type of small candle that’s enclosed in aluminum to contain the melting wax. Use dried leaves and berries in combination with the jack-o’-lanterns, being careful to keep all flammable materials well away from the heat of the candles. To prevent the lightweight oranges from being tipped over, place a piece of sticky florist clay on the bottom of each one.

Step 1: Use the top of a spice jar as a guide for drawing a circle around the top of an orange. Then draw a face onto one side, (A pen or felt-tip marker works best.) Slice off the top of the orange. Scoop out the contents with a melon ball cutter, using a knife to cut the fruit away from the sides of the orange.

Step 2: Place the curve of a large spoon inside the orange, against the drawn face. Using a craft knife, cut out the features of the jack-o’-lantern. (The spoon gives a surface to cut against and protects your fingers from the knife.)

Step 3: Set a tea light candle inside the orange. Use a small piece of florist clay to keep the jack-o’-lantern fixed to the spot where you’re displaying it.