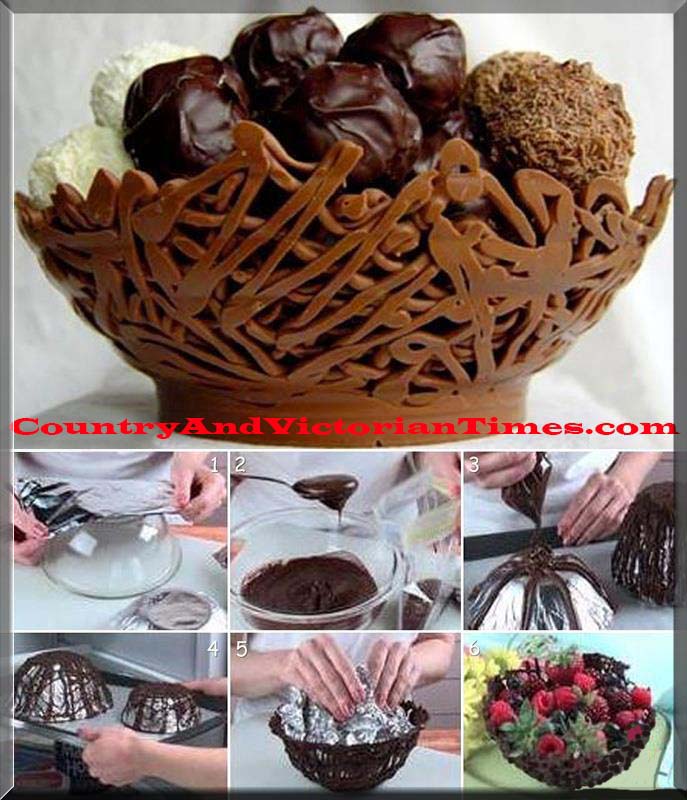
What a completely elegant way to serve strawberries or some other goodies to a special someone or at an elegant party. Take a solid bowl (glass or metal because plastic bowls will tend to shift and can crack chocolate) and use thin foil to cover the outside of the bowl. Melt chocolate or candy melt/almond bark and keep drizzling over foil to create a nesting look. Make sure to get enough so it will be strong and don’t forget to get the ridges of the bowl and the bottom.You can do a two-tone effect of white chocolate/dark chocolate or three if you added a medium colored chocolate. DO NOT FREEZE as this will make the chocolate very brittle. Air dry the chocolate at least eight hours. Gently turn bottom of your new bowl so it is sitting on its bottom. Pull foil away from glass/metal bowl and then remove glass/metal bowl. Then gently pull away from your chocolate bowl. Slight breaks can be fixed with some patching (melt chocolate and hold a piece of foil on the underside of your chocolate bowl and drizzle to repair and hold for a few minutes. Let dry completely before you pull foil away. Your new bowl is ready – would make a great way to serve Mom or Dad a breakfast of fresh strawberries for Mother’s / Father’s Day. For Diabetic’s use sugar free chocolate and if you want to lower calories the rule of the darker the chocolate is the better.
Category Archives: ~Gifts
Family Handprints Art
Saw this piece and wanted to share it with you. I love the idea o putting a hand print of Dad and Mom and then of each of their children on a white background and then having it framed. This would be a great idea to hang over a baby crib or to give to parents from their children on Mother’s Day or Father’s Day or for their anniversary. Would look great above a door or over a mantle for all to see. This would even be a perfect gift for two sets of parents to make for their daughter (bride) or son (groom) for a wedding present and decoration.
CD Cover Picture Frames
These frames are easy to make for gifts and can contain a 2 pictures or artwork from a little one. You can obtain these at almost any stores these days and they are really cheap. You take the cardboard insert out and are going to use this as a guide to get a photo or a piece of artwork. If you want to print a photo out measure this and take the dimensions to your desktop publisher to prepare image for printing. If you are doing this from artwork or a photo already printed trace this onto your photo or artwork and cut out. If the photo or artwork isn’t big enough you can add a border to create a tight fit. On the outside you can glue jewels, sewing notions, stickers etc. You can do this on both sides and can add embellishments around the edges.
PICTURE FROM: FaceBook Parent’s Room
Lady Bug Painted Rocks
Such a simple little thing to do with the kids on a boring summer afternoon. Rocks should be cleaned with an old scrubber and dried overnight. Use acrylic paints and start with covering the rock with black paint. You may want to make two coats allowing to dry completely in between. Follow the simple design from the picture and paint the areas red where indicated and dry. Top with a clean black line down the middle of the back and add black dots on the back also. Add a black dot in the center just after where the red starts on the back. Add two white dots on the face for the eyes. Let dry. When it is all dry coat with two coats of polyurethane to seal. Would make a great gift for the wee ones to give to parents and grandparents, aunts and uncles. Can be placed back in a garden or used as a creative paperweight.
Photo Planting Pot For Gift/Centerpiece
This is a great idea for Mother’s Day – Wedding Centerpieces=
Print on plain paper a series of photos of the Mother’s children or Grandmother’s Grandchildren is sizes ranging from 3×5 to 4×6. You must use regular paper for this project as photos or photo paper won’t mold well to the contour of the pot. Use Mod Podge and brush a coat over the area where your picture is to go and press firmly onto the pot. Use a dry brush to work any wrinkles out that form and then continue until pot is covered. When pot has been given ample time to dry, brush a thin layer of Mod Podge over all the photos getting it into the crevices made from the over lapped photos. Let dry. You can then seal the entire pot with a coat of acrylic spray. Also, think about painting your pot first to give it a new clean appearance. I still recommend using a liner inside the pot – or you could use a thick plastic in the pot before planting. You wouldn’t want such a special gift to be ruined over time would you? You could print the photos as black and white or you could just use color. But test Mod Podge on the color to see if bleeding will occur. If it does spray a coat of fixative or acrylic spray on photos before attaching to your pot. Would be great also as centerpieces for a wedding on each table with pictures of the couple during their relationship.


