Chocolate Banana Peanut Butter / Nutella Healthy Snack

bananna chocolate peanut butter frozen snack healthy
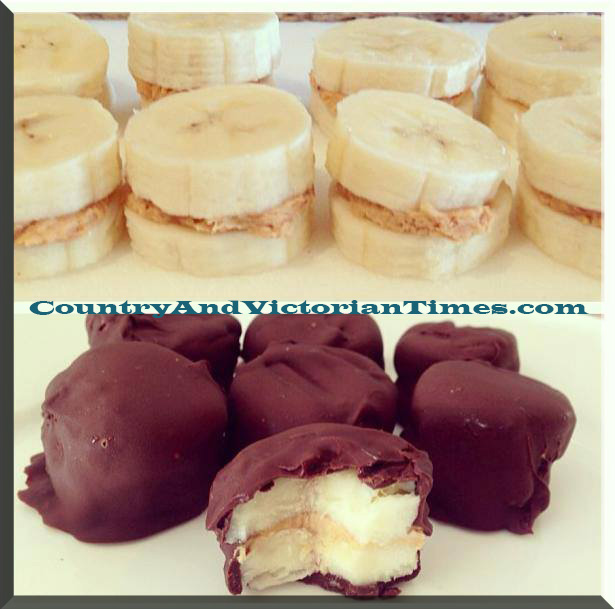
I saw these and my mouth watered. I often find that I want a nice tasty not overly sweet (and in the summer cold) snack. I have tried these and they are sooooo goood! They are rather simple to make and there are some variations. I will talk to you about the basic creation like is pictured and then give you some dynamite options to switch them up.

Slice bananas into 1/2 inch slices. Keep them consistent. Wipe a dollop (you can judge amount of a lot or a little based on preference but don’t make it too thick) of peanut butter (no preservatives and no sugar added – get as organic as you can) on one side and sandwich with the other slice of banana. You will need to freeze these to get them cold. While they are getting cold use a chocolate melting pot (if you are lucky enough to have one – I want one) or use a double broiler (two pots one smaller than the other with the big one having water to boil that you will set the small pot down into to melt chocolate in) to melt chocolate. If you are tight on a budget use candy melts but I often can find dark chocolate chip bags at a dollar store and that is your best bet. Take out the bananas/peanut butter treats from the freezer (you don’t want these frozen hard as a rock because the chocolate will drip right off). If it takes you a long time to get chocolate melted instead of freezer use the fridge. Now roll the banana/peanut butter treats in the melted chocolate and put them on wax paper lined COLD cookie sheets. When you get a tray of them made stick them in the freezer.

OPTIONS:

-Instead of peanut butter use a hazelnut spread from Jiffy or Nutella

-After placing dollop of peanut butter/hazelnut spread on one slice of banana stick slices of nuts (almonds, peanuts, walnut) into spread and seal with the other slice of banana.

-I used dark chocolate but by all means use white, milk or one of the flavored chocolates like mint, peppermint etc.

-After placing dollop of peanut butter/hazelnut spread on one slice of banana stick crushed candies (peppermints, red hots) into spread and seal with the other slice of banana.

-Decorate the outside with a drizzle of a different type of chocolate or melted candies to go along with a party theme or special occasion.

-Keep in the fridge or in the freezer after preparation – delicious both ways.

I hope you enjoy these delicious scrumptious (can be made in a healthy way) treats as much as I do. I enjoy going to the freezer when I get the munchies and pull one of these guys out and enjoy it knowing that they are really not that bad for me.

Colored Lemon Slices

lemon party color food dyeWhat an interesting idea for your tea, your child’s sweet drink or party. Fill a small bowl with water enough to cover the number of slices of lemon to be colored and add liquid food coloring drop until it is slightly darker than desired color. Remember the color will be mixed with the natural color of the lemon so it ill not be perfect. Place lemon slices in the bowl of colored water and make sure each slice goes in individually to ensure proper coloring. Do this for each color you water lemons to be dyed to.

You can also use Kool-Aid unsweetened packages to add color in the same way above except to make sure the Kool-Aid is completely diluted first.

Use this in punch bowls, tea, Kool-Aid, lemonade etc.

Sand & Glue Bowl

253319_10201340330819225_1629635508_n

Mix clean sand and white craft glue to obtain an oatmeal type of consistency (add small spoonfuls of water but no more than two). Clean sand can be obtained from a beach or at a craft store. Blow up a balloon or a beach ball (we had more success with a beach ball as the balloon if too tight can pop while doing this) and rest the tied end into a bowl. Start at the top and pour the liquid and allow to run down. Make sure there are no gaps – you do not want a spider web effect. Dripping is allowed. Allow to dry overnight. Repeat process to create a thick three or four layer effect. Now on the last layer you will watch for it to be almost hard – then you will flip it out over to rest on what used to be the top. You are going to do this to create a flat bottom. Too early this will form in a huge puddle  – too late and it won’t form. Its cheap and that is good because if you mess up try again.

Dorito’s / Ruffle’s / Frito’s Cilli Pie In The Bag

Boulder+Locavore+frito+pie+527This is such an awesome way to serve many people – and many think it is just a fairground food. Think of it as a quick serve to a large group of people with little clean up.

1: Slit bag along the side to completely open it.

2: Pour a ladle of your favorite chilli over top

3: Put chopped up onion (raw or fried) and you can also use chopped green onions (raw or fried)

4: Put cheddar (or mozzarella) on top

5: Have the recipient pinch the top of the bag to seal in the heat and melt the cheese

6:  Dig in – its really good

Change ups: This is the basic ingredients you can add but think about offering a variety of things: cut up cooked hot dogs, tomatoes diced. Also think about making this a different way (the Italian way): add a meatball and mozzarella to Ruffles along with tomatoes, tomato sauce. Think more Mexican: top Frito’s (or Doritos) with taco seasoned meat and trim it out the same way you make tacos

Changing Home Designs According to Seasons by Guest Writer Ella Andrews

Many people view their homes as refuges from the outside world, a chance to escape it. However, there is nothing better than having a home that does reflect some of the weather changes and the natural world. It’s quite soothing to feel spring-y at home, or winter-cozy. These little tricks can be done with proper home design improvements and some creative thought. Here are several ways to reflect the seasons in a natural and tasteful way at home, ensuring a different feel in each season.

Changing home designs according to seasonsAdd natural displays to capture each season. Place flowers, plants and other nature-related objects in the different rooms. For example, arrange a vase with daffodils and tulips in spring, blooming roses in summer, pine cones and berries in autumn and mistletoe and Christmas plants in winter. These flowers will definitely bring a whole new atmosphere in your home.

Adapt the color scheme accordingly to make each room much more beautiful. One of the easiest ways to reflect the seasons at home is to use the right colors and color combinations. Instead of shutting out the outside world when it’s cold and snowy in winter, reflect these natural changes with white candles and silver ornaments. It’s quite challenging to change the colors in your home with every season, but this doesn’t mean that it’s impossible. Of course you don’t have to repaint the walls, you could simply have some specific items that suit the season. In spring and summer you can achieve that with sheer drapes and lighter furnishing. Focus on the living room and the bedrooms – these areas are usually the easiest to decorate and change. In summer, take down all the heavy curtains and use plenty of bright colors – for cushions, rugs, paintings. In winter, aim at pale and neutral colors. In spring choose lime, green, orange, peach, pink and yellow.Changing home designs according to seasons2

Nature has a big influence on interior design. One pretty way to integrate the nature elements in your home design is by choosing different prints – for curtains, rugs, cushions and even posters and stickers. Trees, leaves, lilies, butterflies, birds – use these symbols to bring a beautiful atmosphere to your home.

Fill a bowl with yellow and brown leaves and pine cones in autumn and place it in the living room. Use wood to decorate the rooms – it’s the most natural and prettiest nature element you could make use of.

Arrange rocks and some sand in a plate, in summer, and place it at the living room’s focal point.

Invest in some rugs in different colors, one for each season – red or white for winter, pink or light green for spring, yellow for summer and orange or brown for autumn. Experiment with light and mirrors in the rooms with the most traffic.

Bio: This article has been created by Ella Andrews- dedicated writer, blogger and housewife. Ella likes sharing with her readers valuable advices from personal experience. In order to obtain more of them, visit: http://www.removalshouse.com/removal-companies/WC1-removals-st-pancras.html