Massive Decorated Egg Display

EGGS

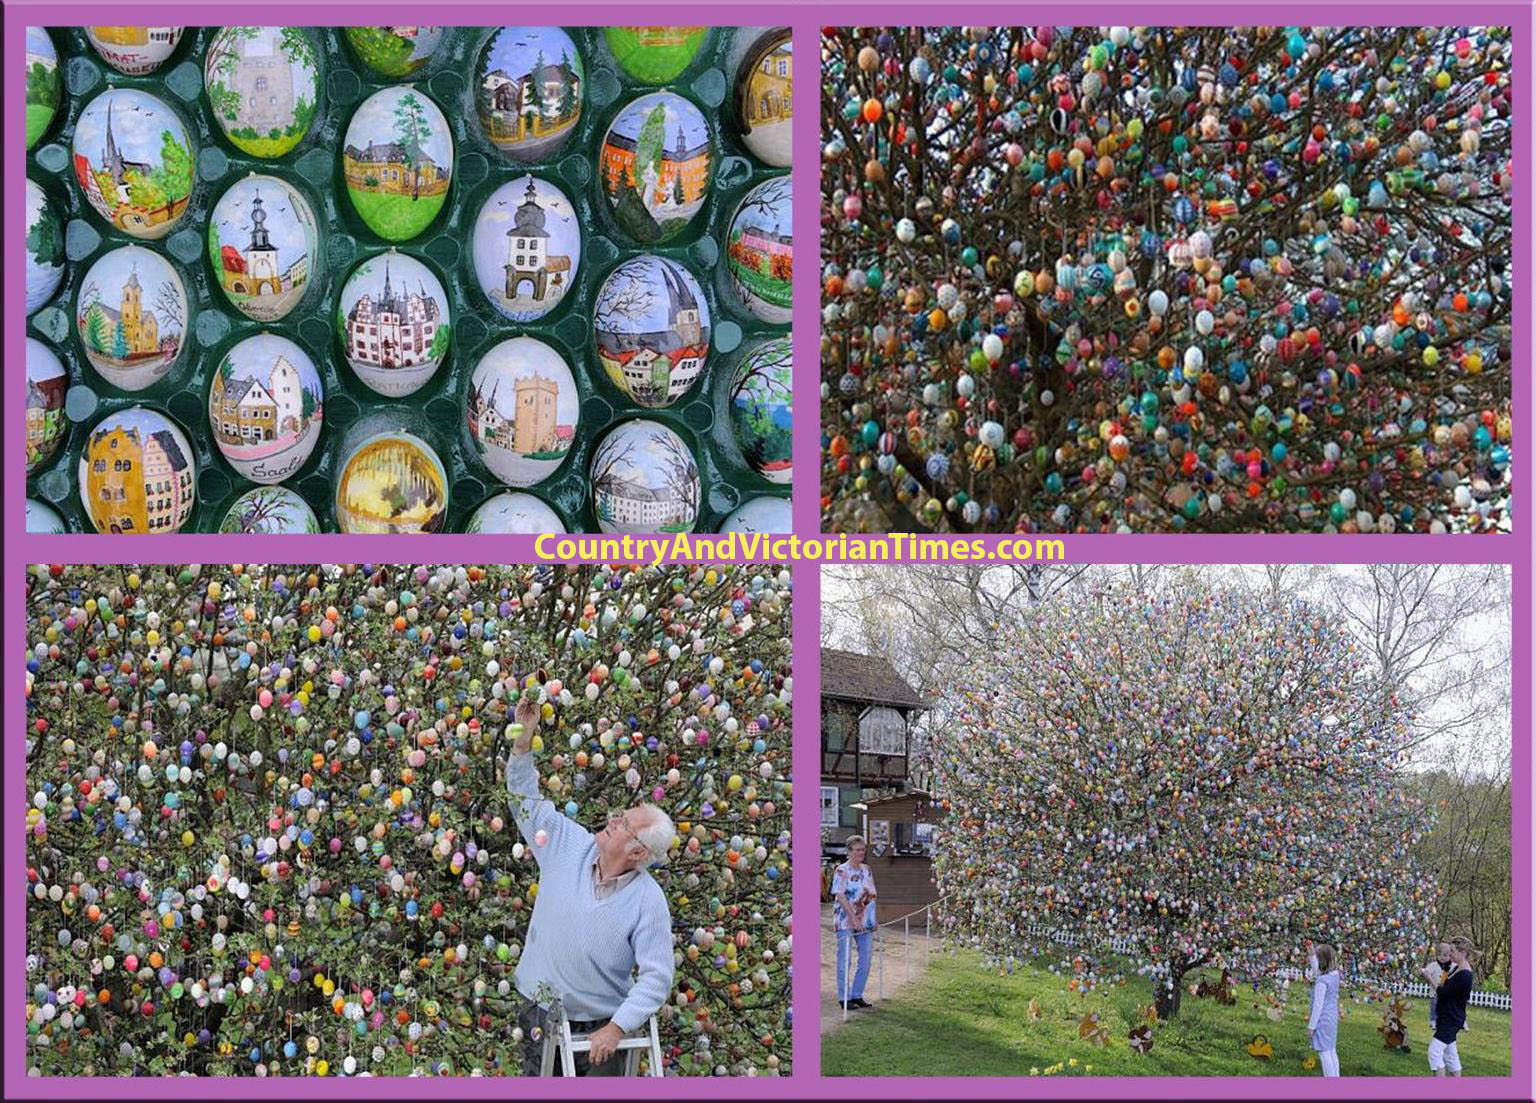
            Easter comes but once a year – but one couple have turned it into a lifetime’s project. German pensioners Volker and Christa Kraft have decorated the tree in their back garden in Salfeld for Easter for more than 40 years.

            The tree now drips with more than 9,800 colorful Easter eggs, painted with pastoral scenes and religious icons. Volker Kraft adds to the 9,800 Easter eggs hanging from the tree in garden of the home he shares with his wife Christa.

            Each egg must be painstakingly emptied of yolk and whites, to ensure it will not go bad, before they can be hand painted and hung out for all to see. The easiest way is to pierce two holes in each end of the egg with a hat-pin, then blow out the contents through a straw. The better equipped can use a syringe pushed through just one hole to extract the gooey gubbins. But be cautious when handling raw eggs – they may carry salmonella.

            Symbol of life: Carefully packed and intricately decorated Easter eggs lie waiting to be hung from the Krafts’ tree. The egg is a pagan symbol of rebirth, widely used in spring festivals before its adoption by early Christians as a symbol of the resurrection of Jesus. For followers of Christianity the eggs are symbolic of Christ rising from his tomb two days after his death on the cross.

            In ancient times, the Zoroastrians painted eggs for Nowrooz, their New Year celebration, which falls on the spring equinox. Sculptures in the ruins of Persepolis , their capital, show people carrying eggs to their king for the occasion 2,500 years ago.

            After their kids moved out of the house, it seemed the Easter Tree would finally catch a break, but grandsons arrived and the Krafts went back to decorating their giant tree. The number of Easter eggs hung by the trees branches grew every year, and in 2010 it reached an incredible 9,500 eggs.

Sent by: Nora Thomas-Chandler

Button Design Lampshade

374635_625988597431232_557376757_nWhat a clever way to update an old lampshade (one you already have or one you get second hand). Spray lampshade white and glue/sew old buttons on to create random or specific patterns. Use various shapes and color to create a hodge podge design or go for color specific and/or shape specific depending upon your desired outcome. Goop would be a great (more permanent) glue for this application. This has me thinking about what else could go onto a lampshade to update a room: bottle caps, hat pins, patches, scrap fabrics – it seems end less when you start and think about it.

Kermit The Frog (Apple)

62664_221009011356958_1407713333_nTo make Kermit you will need:

1 red apple

2 green apples

1 Marshmellow

Handful of toothpicks

Black food coloring

Directions:

Core one red and one green apple. Cut the red apple and one green apple into 16ths. Take two green slices and cut in half. At the widest end stick a toothpick into it and then into your green untouched apple at the base like shown above. Off of one of the red slices cut the skin away. Use a toothpick to insert through this skin and into the green apple to form a mouth. Cut marshmallow in half and insert toothpicks through and into top of apple to form eyes. Use black food coloring to draw the eyes onto the marshmallow. Done! ow you have the makings to make several of these guys. If you are going to wait awhile before serving prepare the parts and submerge all cut apples into a water bath with a teaspoon of lemon juice to prevent browning. Assemble just before serving. remember to watch any children eating these so you can watch the toothpicks being taking out. Get the kids involved – this could be a lot of fun. Serve with a small bowl of peanut butter for a healthy FUN treat!

Photo Planting Pot For Gift/Centerpiece

537905_625561024140656_1372078231_nThis is a great idea for Mother’s Day – Wedding Centerpieces=

Print on plain paper a series of photos of  the Mother’s children or Grandmother’s Grandchildren is sizes ranging from 3×5 to 4×6. You must use regular paper for this project as photos or photo paper won’t mold well to the contour of the pot. Use Mod Podge and brush a coat over the area where your picture is to go and press firmly onto the pot. Use a dry brush to work any wrinkles out that form and then continue until pot  is covered. When pot has been given ample time to dry, brush a thin layer of Mod Podge over all the photos getting it into the crevices made from the over lapped photos. Let dry. You can then seal the entire pot with a coat of acrylic spray. Also, think about painting your pot first to give it a new clean appearance. I still recommend using a liner inside the pot – or you could use a thick plastic in the pot before planting. You wouldn’t want such a special gift to be ruined over time would you? You could print the photos as black and white or you could just use color. But test Mod Podge on the color to see if bleeding will occur. If it does spray a coat of fixative or acrylic spray on photos before attaching to your pot. Would be great also as centerpieces for a wedding on each table with pictures of the couple during their relationship.

Save A Seat For Your Departed Loved One

934722_624999000863525_1600012151_nI think this is such a very thoughtful way to feel like that special someone who you love so very much can participate in a special day. This is very cleanly done with all black and white and a ‘kickstand’ is made to the front to help ensure the picture does not slide. When my Wife and I got married we made mini-collages in a frame for each of the people who were special to us but weren’t here. Each frame had photos that were special to us. The frames were decorated with wedding colors and we still have them in out living room a decade later so they can participate in our daily lives. It feels like a way to honor them. Do you have any ideas about how to incorporate those who have passed away. I would love to hear about them in the comments.