7 Steps To Take Before Your First Renovation


House renovation is a great way to get a ‘new house’ without moving to a different place. But planning your first renovation can be complicated because there are so many elements to consider. You can’t just focus on what you’d like your home to look like, it’s important to remember about the practicality of such changes. To achieve the best possible results, there are a few simple steps you have to take before any work starts.

Consider the location

Depending on the area you live in certain changes, like house extensions, may not be possible. If you are still looking for a new house, which you’ll want to renovate before moving into, it’s also important to consider the neighbourhood when deciding on a purchase. For people planning on removals to Chelsea, going there and having a look at the other buildings in the area may not be a bad choice. It’ll give you an idea of what to expect.

Set a budget

Calculate how much money you are willing to spend on a renovation. Some changes may just be too expensive and will have to be discarded. Focus on the most pressing matters at first, smaller alterations can be implemented further along the line. You should also count in a contingency of around 20%, which will let you avoid stress in case of any unexpected expenses. Knowing exactly how big your budget is will help you plan the renovation.

Plan the changes

When you think about what your dream house would look like, there are definitely elements that are more important to you than others. But your expectations may not always fit in nicely with the rest of the project. Consider what will work within the space you have. A glass stairs design is great for modern interiors, while wood floors will help in achieving a cosy atmosphere. Figure out what you’d like to change, this way, you’ll be able to ask contractors for exact quotes.

Find contractors

Price should never be the deciding factor when choosing a contractor. The cheapest one will not necessarily be bad, but there’s no guarantee that the most expensive one will be the best as well. Try to find good contractors through the recommendations from people you know. If this doesn’t help, at least try to look for reviews online. Renovations can get messy and time-consuming even at the best of times, and hiring inexperienced contractors will not help the matter in any way.

Get the necessary permits

Some parts of your renovation, especially if you plan on changing the structure of the building, may require planning permissions. You need to apply for those before starting any construction works, so make sure to find out what is necessary in your case. If you’re still unsure whether you need one or not, it’s advisable to check with your local authority. Having a house that is listed or located in a Conservation Area can limit your options, but even if you don’t need any permits, you’ll still need to comply with building regulations.

Check the insurance

You may already have your property insured, but does the insurance cover eventual damages sustained during building work? Will your insurance still be valid even if you move out of the house during the renovation? You need to carefully consider all the aspects to avoid unpleasant surprises later on. It may be a good idea to consult a specialist on the matter. Another important thing to check is whether the contractors working on your renovation are insured. Accidents can happen during construction works, so it’s better to be safe than sorry.

Schedule the renovation

Some parts of your renovation have to be finished before the others can start. It’s especially important in situations when you have hired different contractors to perform different tasks. You’ll need to schedule the works carefully. Make a list of all the changes in the order they have to be completed in. This way you’ll make sure that the whole renovation will go smoothly and you’ll avoid unnecessary damages and additional expenses.

The properly planned renovation will allow you to avoid unpleasant surprises during construction works. If you follow the steps listed above, you’ll get a house that’s, if not perfect, then at least close to your dream one. And after all the building work is done, you’ll be able to focus on the more enjoyable task of decorating your newly acquired space.

My Cluttered Life – Part 2

I can’t tell you the number of items I find around the house that were purchased and either weren’t what I was looking for, didn’t fit just right, or just decided I really didn’t want anymore. They get put down with the intention to return.

Sometime attempts get made to do the return but where is the receipt? If I can’t find the receipt you get store credit and, well, I really want my money back. So it sits, in a pile, until its too late to return. Now what do I do with it? Sigh….

If it really can’t be used it either needs to go to the trash or in a container to be donated. It can be given to a friend or family member, as long as it goes out of your home. A big rule: No holding or storing items for others who do not live with you.

Lots of money is waited this way. I wonder if you took one popular store and added all the sales of product from that store that were never used and had had intention to be returned but ended up in a death pile in someones home would tally up to. Shivers…

So not much can be done for these items once they have been in your possession for a period of time but to donate, five away or trash. But, what can I do to prevent this from happening again in the future. Here is an approach I have developed to keep this from happening.

Get a zippered pouch and keep it in your car and get in habit of putting receipts in the zippered pouch so returns are easy. If you find you need to return something put the item back in the store bag with the receipt taped to the item so it does not get lost and put it in your car. Next time you go to that store or drive by that store do the return.

Make sure you regularly purge your zippered pouch of receipts after a certain time goes by when you can’t usually return, like 90 days, unless you need the receipt for a warranty.

Since I have got this habit it makers returns easy, it keeps a pile from developing and I have not once had to dig through the trash to find a receipt.

Lamp & Bowl Art For Your Garden

I found this great idea on the internet and wanted to share. These are mushrooms made from bowls and candlesticks and the larger ones are made from lamps. They are so unique and would be a great spruce up for recycled art in your garden. The best thing is you can source the materials from your old items or cheaply at any thrift or yard sale.

There are a variety of methods to make these and vary on the items you are using. The easiest is to drill a pilot hole through the bowl and into the candlestick or lamp post. Screw a large heavy duty screw through bowl and into lamp post or candlestick. You need to use a drill bit designed for the metal you are using. If you have a smooth surface between the inside of your bowl and the stem then you can use epoxy.

To paint you will need a spray paint like Krylon that is designed to adhere to metal. You can paint them traditional type colors or get really funky with the color choice.

Make them yours. You can also glue little accessories on them like little gnomes or fairies. Moss and pebbles glued on the the base where it sits in your garden will make them loo like they have been there for a long time.


6 Tips to Master Home Appliance Repair

Sometimes you just gotta take matters into your own hands. Whether it’s because you want to develop your skills, or if you just want to save some extra money, DIY repair is a great choice. You will be able to extend the lifetime of your appliances considerably, and you won’t have to rely on unreliable repairmen who will charge you a fortune.

However, this is not an easy task. Without the proper training, you may be at risk of hurting yourself, or, at the very least, have the risk of making things worse. So, safety first, get some protective gear and read about our top six tips to master home appliance repair below.

Get the basics down

No matter how obvious or banal this piece of advice is, we still expect people to read it. Too many wannabe DIY repairmen end up getting hurt or just destroying their appliances because they didn’t start with the obvious. So, first of all, always unplug the appliance before you start working on it. Furthermore, once you’re done, keep an eye on the said appliance and make sure everything is going well. The last thing you need is to have your microwave catch fire while you’re on the other side of the room.

Next, actually check to see if there are any obvious problems before you start disassembling the entire thing. So, double check the power settings, or whether the thing is actually plugged in. Maybe the problem isn’t in the appliance, but in the outlet. Maybe there are some issues, like a simple filter being clogged. Or, on the other hand, maybe the appliance isn’t working due to a standard operational characteristic it has (like not working when placed on an uneven surface).

Check the moving parts

Moving parts tend to be the most likely culprit when it comes to home appliance repair. We suggest you start with them when you are repairing your appliance because of their tendency to wear and malfunction quickly. So, take a look at the fans and the motor of the appliance. You can often check this by the noise the appliance makes. Since you are fixing appliances that you yourself own, and have probably owned for a long time, you are probably accustomed to the noise they make. Anything different is a tell-tale sign of what’s actually wrong. Now, as far as fans and belts are concerned, get the right appliance spare parts at any specialized store, and get it done. On the other hand, motors are a bit more problematic and may require professional assistance.

Stick to the 50% rule

The 50% rule goes as follow: if your appliance is older than 50% of its expected lifespan, and if the cost of repairs and replacement parts is more than 50% of the price of buying a new one, you shouldn’t bother. The most financially sound decision here is to simply replace it. Of course, you can always disassemble it for your own enjoyment if you’re gonna replace it soon.

Get the right tools

Now, we are not saying you should buy the newest, most expensive and advanced toolkit on the market. But, you need to understand that often a screwdriver will not be enough. Something middle of the line will definitely be enough. Besides, if you want to continue with your DIY home repair efforts, you need a good toolkit anyway.

Now, one specific, important tool that you should get is a nice multimeter. One of the more annoying things when doing home repairs is that it’s hard to figure out if the problem can be found with the wiring. With a multimeter, you can measure voltage, and figure out which wires are ok, and which are not.

Check the ignition systems

For most gas-powered appliances, the most common problem is the ignition process. This goes for appliances that have electric starters and pilot lights as well, however. The point being is that stoves, for example, are very durable appliances that rarely break down completely. The most likely culprit tends to be their ignition system. So, we suggest you start there, check if there is any soot, or if the entire thing is properly aligned.

Check pipes and hoses

Dishwashers, washing machines, and basically any other water-based appliances depend on pipes and hoses to use water. The most likely culprit here tends to be these same hoses. We suggest you check them, and the surrounding valves, first when you want to repair appliances like these.

Conclusion

If you really want to get better at home appliance repair, we suggest you take the above advice to heart. Work on getting the basics down, get the right tools and stick to the 50% rule. Check your moving parts first, figure out where your hoses are, and get familiar with the ignition processes on your stoves.

Easy & Cheap Way To Child Proof Your Door Handles

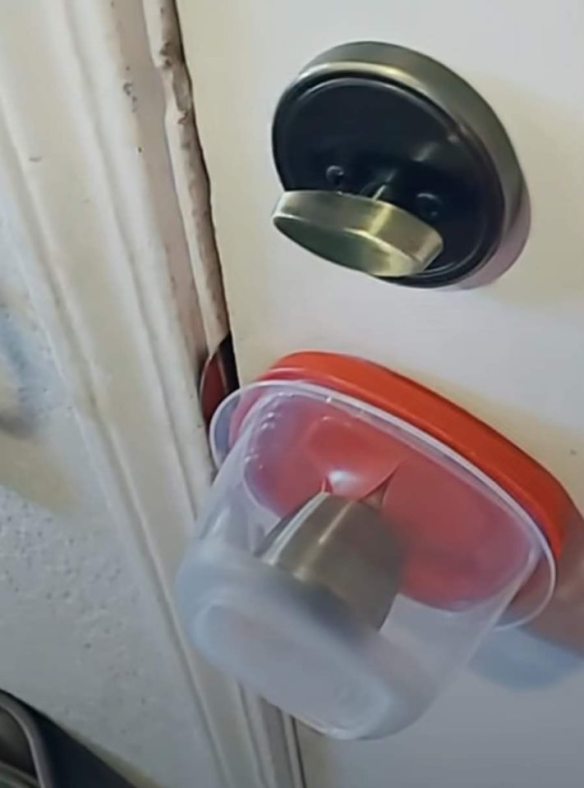
This is not my setup but it was where I got the idea from. Credit to the original owner of the photo.

We recently ran into a problem with our young daughter. We went to visit relatives and she found her way out of the front door and was playing with the neighbors children. To think of the nightmare that could have happened. I get sick thinking about it.

I couldn’t very well ask the relatives to add child protective locks on their doors. So we had to come up with a simple cheap and effective solution to keep her safe.

We went to the dollar store and bought a rubber main salad bowl. We cut an X in the lid just big enough to force the door handle through. This lid screwed on to bowl tight. So we pushed the lid onto the handle and screwed the bowl on when we went to sleep. For a dollar it was a bit more protection – although not fool proof.