Snowman Christmas Month Countdown / Advent Calendar

1378480_971733206190101_8825816831182928791_n
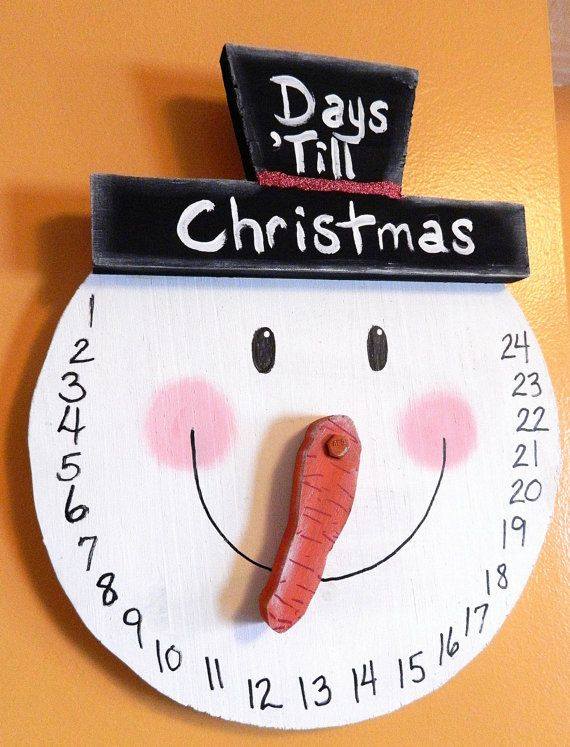
This project requires working with a jigsaw but don’t get scared – it is easy and as you can see with the pic if you mess up a little it still looks cool.

Cut a twelve inch circle (you can buy this from Micheal’s or Hobby Lobby).

Next cut the carrot for the nose.

Next – freestyle cut a hat – use the hat in the picture for an example. Bottom part of hat should be at least ten inches wide.

Paint hat black. Paint head white and carrot orange. When dry you can roughen all fronts with fine sand paper. This gives it a rustic worn appearance. Paint on cheeks with pink. Let dry. Using a sharpie marker add numbers, mouth, eyes. With white paint add the text “Days Til Christmas” on his hat. With the sharpie marker make ridges in carrot. Use a nut and bolt that is just long enough to go through carrot into the back side making sure to add to washers between carrot and face. Epoxy the hat to the head. For additional security use small screws and drill from the back to front to hold hat on.

At this time you also want to make a hanger on the back which you can buy already created or you can use wire around the house. Attach hanger on with screw from the back making sure to get it in the middle of the head. With Sharpie marker make numbers 24 – 1 going clockwise. You may want to add at least one light spray of polyurethane to keep in good shape.

Hang and let your kids have a great time moving the carrot to a new day while they wait for Santa.

A Desert Christmas

Image

1508507_609471299117964_1804267105_n

Melting Snowman Sugar Cookies

Snowman_Cookie_WEBHow cool and how SIMPLE! Do we love it? YES!

Make your favorite sugar cookie recipe. Make your favorite sugar cookie icing recipe when cookies are cooled and make a “puddle” that looks like the snowman has already melted. While the icing is still wet, stick a marshmallow to one side. Let icing dry. Use a red/orange candy sprinkle for the nose and black icing to make eyes, mouth and arms. Use blue icing for the scarf (or change this color up) and green for buttons (or change this color up as well).

I told you it was simple – and it looks so cool you people will think you took a lot of time to create your masterpieces.

Milk Jug Snowman Outside Decoration

76431_477678165608782_426290372_nThis is so simple of an idea and you can get your child involved to help get a kick start to the holiday festivities. Thoroughly clean milk/orange juice container by letting soak overnight with water and about two tablespoons of bleach. Rinse and dry. While you are waiting for this use old buttons or paper cutouts for mouth, nose and eyes. Get creative and give the snowman earmuffs, eyeglasses or whatever other creative add-on you can give to provide your snowman with a personality. For the lights: If making three or more like in the picture use a string of lights that is 150 lights. Puncture a hole in the back of the jug and push lights until you have about forty in each jug. This will provide room for the snowman to be placed close but as you desire. You can also use a little sand or some rocks in the jug before you put the lights in them to hold them securely if wind should arise.

Melting Snowman Cookie Idea

319542_478490855522269_1341728421_nGreat idea: Make sugar cookies top with icing and (malt ball covered with frosting) or (gum paste ball) and then place M&M’s for the buttons and don’t forget the snowman’s arms, eyes, nose and mouth made of piped frosting or/or licorice. Great for a party and can you imagine the smiles you will get from your kids if these were waiting for them when they get home from school. Use the same idea for a melting witch for Halloween.