Christmas Treat Cone

Materials:

  • Scissors
  • Crayola® Glue Stick
  • Crayola® Washable Markers – Classic, Thin Tip
  • Cardstock – White
  • Pencil
  • Creatology™ Chenille Stem – Red
  • Creatology™ Chenille Stem – White
  • Creatology™ Pom Pom – White
  • Crayola® Crayons

Instructions:

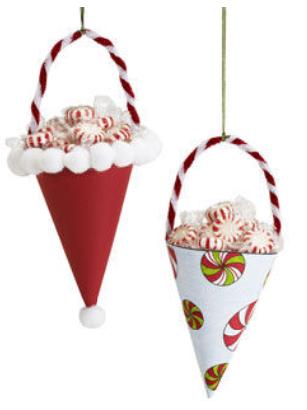
  1. Print “Holiday Treat Cone” pattern onto white cardstock.
  2. Color in peppermints with markers and crayons as desired.
  3. Cut and form cone with tab inside. Secure tab with glue. Let dry.
  4. Create handle by twisting red and white chenille stem together and attach to inside of cone with glue. Let dry.
  5. Pattern can also be traced onto any paper to create endless variations.
  6. Embellish cone with Pom Poms as desired. Let dry.

Kwanzaa Greeting Card

Materials:

  • Creatology™ Chenille Stems – Multi; Red, Green, Brown, Black and Yellow
  • Cards – White
  • Creatology™ Construction Paper
  • Creatology™ Foam Stickers – Alphabet Dotty
  • Scissors
  • Ruler
  • Pencil
  • Aleene’s “Tacky” Glue®
  • Paper Envelope

Instructions:

  1. For Card:
    Cut brown construction paper to fit card front leaving ¼ inch white card border.
  2. Use ruler to tear a ½” width of orange construction paper the length of the card, glue in place.
  3. Use foam letters to personalize card on orange paper strip.
  4. Cut chenille stems as shown on card and glue in place.
  5. Use small roll of yellow chenille as light on candles, glue in place.
  6. Use photo as your guide to make envelope and personalizing with foam letters.
  7. For Envelope:
    Cut strip of orange construction paper to 3/4″ x 3-1/2″ and tear off ends as shown. Glue strip to front of envelope.
  8. Cut three green, one black and three red chenille stems to 1/14″ pieces. Glue over construction paper as shown.
  9. Add name using foam letter stickers.

Kwanzaa Kufi – Hat

Materials:

  • Scissors
  • Duck® Tape – Black
  • Duck® Tape – Green
  • Duck® Tape – Red
  • Stickers – Letters
  • Zots™ Glue Dots
  • Buttons of Choice
  • DMC® Needle
  • Floss
  • Ruler
  • Pencil
  • Glue Gun (Adult Use Only)
  • Parchment Paper

Instructions:

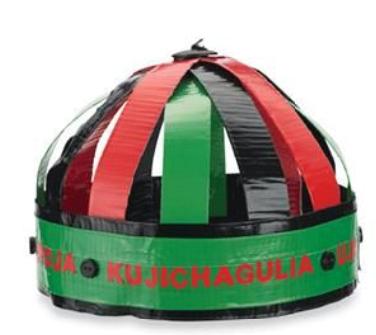
  1. Overlap three 24-inch lengths of black duck tape until it is 4 inches wide. Use the parchment paper to build your sheet of tape on.
  2. Flip piece over, remove paper and fold 1 inch from each side. This creates your band.
  3. Overlap two 24-inch lengths of green tape, flip over, remove paper and fold sides to center to create a 1-½ inch green strip.
  4. ADULT: Glue green band to center of black band.
  5. Use letters to add words around band, gluing black buttons between words.
  6. Cut a 12-inch strip of each color, folding to create a 1-inch strips.
  7. Form an X with the colors, stacking them on top each other.
  8. Sew strips together using button to hold. Fan out.
  9. ADULT: Glue your wide black band together.
  10. ADULT: Glue strips to inside band spacing as shown.

Hanukkah Train

Materials:

  • Craft Smart® Acrylic Paint – Bright Blue
  • Craft Smart® Acrylic Paint – Hunter Green
  • Craft Smart® Acrylic Paint – Brown
  • Craft Smart® Acrylic Paint – Pale Blue
  • Craft Smart® Acrylic Paint – Purple
  • Craft Smart® Acrylic Paint – White
  • Craft Smart® Acrylic Paint – Black
  • Craft Smart® Acrylic Paint – Hot Pink
  • Crayons
  • Creatology™ Foam Sheet – Yellow
  • Foam Stickers – Numbers
  • Creatology™ Chenille Stems – Multi
  • Scissors
  • Paint Brush
  • Aleene’s “Tacky” Glue®
  • Paper Towels
  • Paper Plate
  • Wood Train Letters

Instructions:

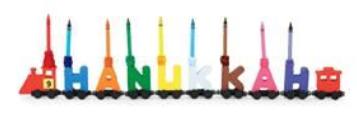
  1. Paint train body pieces as shown, let dry.
  2. Coil a chenille stem to coordinate with each car, making sure the coil is big enough to wrap around whole crayon.
  3. Glue coil to top of each letter car. Insert coordinating crayon.
  4. Cut 1″ square of yellow foam, remove backing and place on engine as shown. Add number to yellow square.

Star Of David – Hanukkah

Materials:

  • Craft Sticks
  • Ceramcoat® Acrylic Paint – Azure Blue
  • Ceramcoat® Acrylic Paint – Caribbean Blue
  • Creatology™ Chenille Stem – White Iridescent
  • 3M® Scotch Tape
  • Cardboard
  • Crayola® Blunt Tip Scissors
  • Craft Smart® Paint Brush
  • Craft Smart® All Purpose Glue
  • Paper Towels
  • Paper Plate
  • Jewelry Essentials™ Sequins

Instructions:

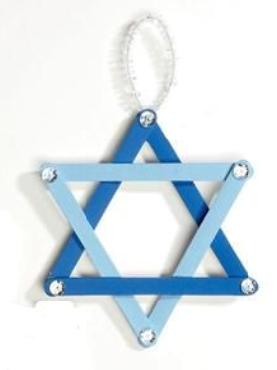
  1. Paint 3 craft sticks-Azure Blue, let dry, and glue together to form a triangle. Let dry.
  2. Paint 3 craft sticks-Caribbean Blue, let dry, and glue together to form a 2nd triangle. Let dry.
  3. Glue triangles together as shown to form the Star of David.  Let dry.
  4. Glue sequins to each corner.  Let dry.
  5. Cut and glue a looped piece of chenille to the backside of star as a hanger.  Let dry.