Does Your Garden Need A Lawn?

Knowing full well the kind of care and time it takes to create and maintain a lawn of enough quality that it looks good enough to be worth having, you may be wondering as to whether it is the right thing to have in your home. Whilst larger houses will almost always benefit from a big back or front lawn, there is no loss of pride in deciding that the old style of having a well manicured lawn may not suit your home, and it can often be a massive waste of time to try and procure one, if it is only going to turn out as some patchy scraggle of land. It is much better to try and ensure that you are getting the best out of your outdoor areas in terms of size, shape and the style of building. It is also a good idea to ensure that you have a garden that you find easy and time efficient to keep in check. You don’t want the expert garden maintenance to become such a trial that you end up having to call in the gardening experts every week, so ensure that your garden clear up leaves you with an area that you can enjoy and maintain with ease.

For a start, gardens of a strange or unaccommodating shape can be difficult to make work. This is particularly the case with a lawn. A narrow strip of lawn set amongst the high walls of a terraced home’s back yard will often look a bit flat and oppressive. If you have a garden that slopes drastically, then the use of the lawn will often be difficult, in that you can really play games on it, and putting tables and chairs out will lead to uncomfortable seating! Instead, why not build tiers with old railway sleepers, and plant them with interesting plants or vegetables? This will yield a lot more interesting looking surroundings than fastidious lawn care! You should find that there are a number of ways in which you can break up the levels as well as the angles in your garden, to ensure that you are less at risk of missing the idea of a lawn.

In terms of the shape of the outdoor area, you will need to understand the ways in which the eye moves. You may want to have a conversation with a landscape gardener, as they will have an excellent understanding of this, and a brief introduction into landscape gardening can be all that you need to get things going in terms of planning your dream space. They will likely tell you that curves in the plot as well as obstructions for the eye to move around, will break up the space in a less linear way, leading to more interesting spaces, that feel bigger, or at least more interesting. If you have a long and narrow garden, you can break it up with raised decking at the back, or even an overhanging tree in a corner. If your garden turns a corner, making it difficult to enjoy the space properly, why not turn that extra part in to a vegetable patch, and grow yourself some fresh produce? The use of hard decking or paving in conjunction with large terra cotta pots and large plants will give the place a sophisticated yet still verdant feeling. This is prefect if the soil beneath is not of optimum planting condition, or you simply want a more sturdy place to relax! You should find that landscaping with garden design services yields a great number of ideas!

For some more great information about yard care check out this website: https://www.experteasy.com.au/lawn-mowing-and-lawn-care

A Guide To Cleaning A Gas And Rayburns

An AGA or Rayburn, the traditional range cookers from Britain, often form the heart of a country or farmhouse kitchen. AGA owners are simply passionate about them, while others rave about Rayburns, which also provide hot water and central heating. Reconditioned AGAs now sell for a small fortune in the major cities, where they’ve become very fashionable kitchen accessories.

With oil, gas and the traditional solid fuel versions all available, there’s great flexibility in fuel sources. Of course, solid fuel versions require more cleaning as soot and ash from coal can quickly build up. With potentially harmful fuels used in the first two versions however, it’s absolutely vital to take extreme care when cleaning – especially inside.

A guide to cleaning agas and rayburns
It’s crucial to have both types of range serviced regularly to keep it running in tip-top condition, and safely. Always use a qualified, trained AGA engineer. But a lot of cleaning and prevention of problems can safely be undertaken yourself at home. While the ranges are simple to clean, the best way to keep them looking as if they were new is to prevent dirt and grease building up in the first place.

If anything spills onto vitreous enamel surfaces, it needs to be cleaned away immediately with a damp rather than wet cloth. That includes the doors and front, and sometimes the back plate. If spills are given a chance to bake dry, they can stain and are much harder to remove. Milk and fruit juice is particularly important to get off straight away. If you don’t, the acids will weaken and stain enamel.

Inside the oven, splashes aren’t a concern as they simply burn off. The dust left behind can just be brushed away, and it’s OK to use wire brushes on anything that’s cast iron inside. There are even self cleaning models now. It’s the same with the hot plates: most spillages simply burn away fast. Avoid cleaning them when the range is hot.

So its the delicate enamel that’s the most important to protect. It can be scratched and dented, so make sure the doors and wheel vent are treated with care. Far better to handle them with oven gloves than to kick them shut when they are hot. You can buy branded cleaners and cloths specifically designed for cleaning Aga and Rayburn enamels. A soft rather than abrasive soap pad also works well. Look for products that have the VEA – Vitreous Enamel Association – seal of approval.
A guide to cleaning agas and rayburns2
It’s very important not to use oven cleaners in spray form either inside or out, nor scourers, nor abrasive creams. Also don’t use very wet or cold cloths: damp only and warm is good. A gentle cream south east London cleaner should be fine. You can hoover away dust, but only when the range is not lit. A good polish with a lint-free, soft cloth, will buff up the surface, rails and lids to a shine. For ease, the doors can be removed as can the insulating rings: just don’t mix them up! Each only fits perfectly on its original position. Don’t soak any of the parts in water, however.

Older ranges may be more prone to scratches, stains and scorch marks than modern models. Enamel has come a very long way since the 1950s! A modern Rayburn’s surfaces should be able to withstand sudden temperature changes, and maximum heats of 400 degrees centigrade. Acids in food should not stain them these days. The enamel is hard and wont chip very easily, and it has the advantage of not allowing bacteria or mould to develop on the surface.

How To Grow An Apple Tree From A Seed

Some people love to have trees in their garden. Not only are they very attractive, but they also provide us with delicious fruit which can be eaten raw, baked or can be used in many dishes.

There are a variety of trees that one can grow, varying from apple trees to pear trees. There are some trees that cannot be grown in England due to the weather, so before you decide to plant a tree, you need to ensure that the type of tree that you intend on planting will not only grow in these climates, but will also produce fruit. After all, a fruit tree with no fruit may as well not exist.

This article aims to provide you with step by step instructions, which will enable you to grow your very own apple tree.

How to grow an Apple Tree from a Seed
The first thing you need to do is get a hold of some seeds. Whilst you can purchase these from plant and gardening stores, there is an easier and cheaper alternative. Simply eat an apple and save a few of the seeds. This seed needs to be dry, so make sure that you allow it to be fully dry over a period of a few days.

Next you need to wrap your seeds up in some damp tissue paper or paper towel etc. and place them in the fridge. You want to keep them in there until the seeds start sprouting. On average, this takes about four to six weeks.

Once the seeds have sprouted, remove them from the fridge. Fill a small pot with some soil and dig the seed in about halfway. Lightly water the pot to moisten the soil. Keep the pots indoors for the time being. Somewhere like a kitchen windowsill is great since they are constantly exposed to sunlight. After some time, you will notice some growth.

Once you see this growth, it is time to transfer your sprouted seedling to a larger pot. Water the plant daily to promote growth. You can use fertilizer or compost (if you are planning on growing organic apples) to fertilize the soil on a regular basis.

How to grow an Apple Tree from a Seed2
Once your plant is large enough to support itself and not be damaged by animals that may come into your garden e.g. cats, it is time to transfer it from the pot into the ground. Make sure that you pick a space that is exposed to the most sunlight. You also want to make sure that the space is large enough to accommodate a tree.

Apple trees can take many years to grow, but for the first year, you are pretty much in charge of watering it and providing it with the nutrients that it requires. After the first yea passes, you let nature take its course and allow your apple tree to soak up the nutrients that have accumulated in the soil over the year.

Growing an apple tree is a waiting game. You never really know how long it will take to fully grow and apple tree and get a fruit.

Keep pruning to a minimum and only get rid of branches, leaves etc. that need to be removed.

After years of waiting, you will finally go into your garden one day and see that perfect apple which will be fresh and organic (as long as you do not use any chemical fertilizers, fungicides etc.).

Sure, growing an apple tree is a lengthy process, but the end result will make it all worth your while. After all, the whole family can enjoy an apple tree.

If you need some additional information about your home and garden, find it on: http://www.londoncarpetcleaner.org.uk/greater-london/

Old Bath Tub Turned Into Seating Area

eft

10353192_10204308639660260_1953544052678936601_nl I love ideas like this – I have no idea how it was done to such detail. This would literally last for a lifetime plus (just replacing the cushion). I would believe it could have also been cut so that instead of one side being left it could have been cut so the back and small amounts of sides could have been left to make a couch. The paint used must have been enamel and I imaging polyurethane was sprayed to make a finish that is very durable.

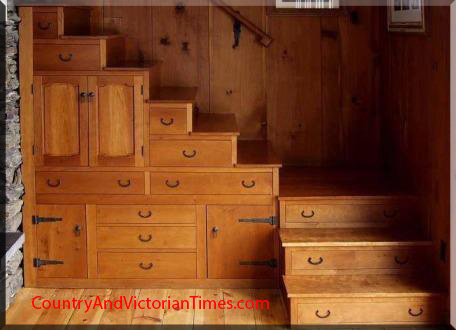
Cabinetry Of Stairs

425027_10151029565699123_1719864149_nThis is awesome – I could only imagine having this in my home! I am sure it would cost a fortune but the pure design would work well let alone the usefulness of it!