The Hidden Dangers of Standard Tubs & How to Design Safer Alternatives

Bathrooms should be places of relaxation, renewal, and personal care, but they are also one of the most common locations for household accidents. Standard bathtubs, while seemingly harmless, often conceal hidden dangers that can cause serious injury—especially for children, older adults, and people with mobility challenges. Understanding these risks is the first step toward designing safer, more accessible alternatives that enhance both comfort and security.

The Risks of Standard Bathtubs

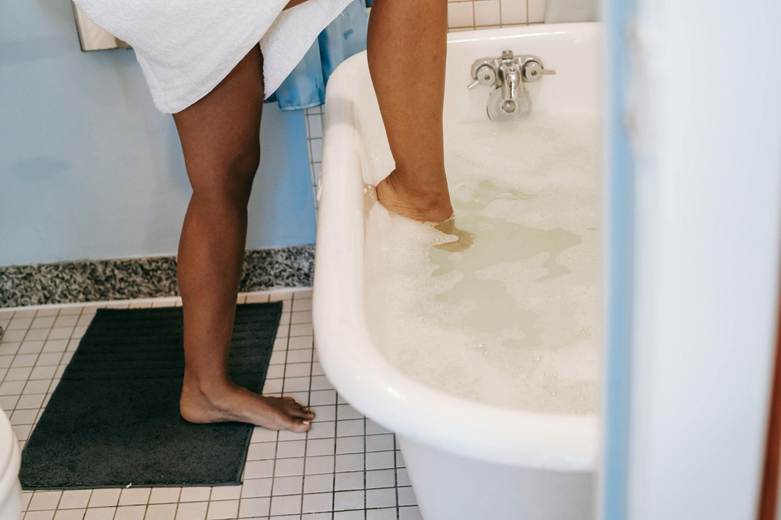
A traditional bathtub has a simple design: a deep basin with high sides, a smooth, curved interior surface, and a drain at one end. While functional, this design presents several safety hazards.

1. Slippery Surfaces
 Porcelain, enamel, and fiberglass finishes create sleek surfaces that can become dangerously slick when wet. Without proper traction, slipping inside the tub or while entering and exiting is a common cause of bathroom-related falls.

2. High Entry Walls
 The typical bathtub rim is 14–20 inches tall. For many people, stepping over this barrier requires balance, strength, and flexibility. For those with mobility impairments, arthritis, or poor balance, the maneuver can be both difficult and dangerous.
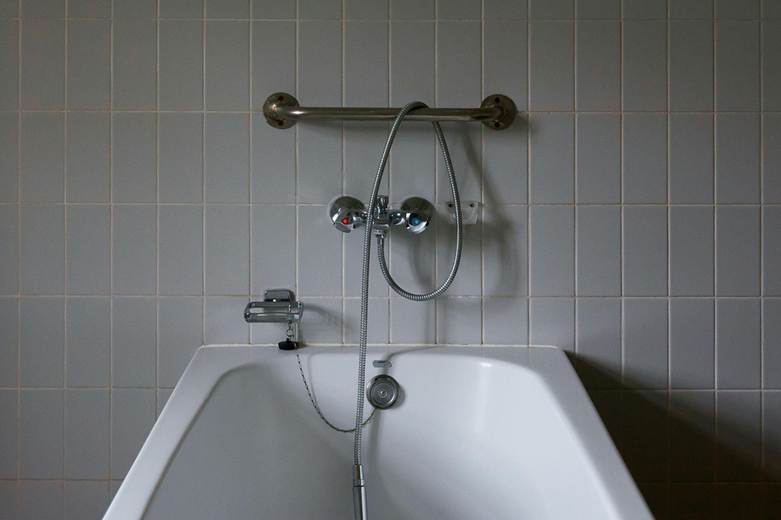
3. Lack of Support
 Most standard tubs do not include built-in grab bars or non-slip flooring. Without these features, users have little to hold onto for stability, increasing the risk of falls.

4. Water Temperature Hazards
 Another overlooked danger comes from scalding water. Standard faucets and mixing valves can cause water to heat quickly, creating burn risks, particularly for children and older adults with thinner, more sensitive skin.

5. Space Constraints
 Standard bathtubs are often narrow, leaving little room to maneuver safely. This can be especially hazardous for individuals who need assistance with bathing or rely on equipment such as transfer benches.

The combination of these risks makes bathtubs one of the leading causes of bathroom injuries. According to the CDC, falls in the bathroom account for a significant portion of emergency room visits each year, and many of these injuries stem directly from tub-related accidents.

Designing Safer Alternatives

Fortunately, modern bathroom design has moved far beyond the one-size-fits-all tub. That’s especially important when multiple generations are using the same bathroom, and each family member has different needs. There are now safer, more inclusive options that prioritize both accessibility and comfort.

1. Walk-In Tubs
 One of the most popular alternatives, walk-in tubs feature a door that allows users to step in without lifting their legs over a high wall. Many also include built-in seating, non-slip flooring, and strategically placed grab bars. For individuals with limited mobility, walk-in tubs can significantly reduce the risk of falls while still offering the therapeutic benefits of soaking.

2. Slip-Resistant Surfaces
 Whether designing a tub or shower, flooring material matters. Non-slip coatings, textured tiles, or built-in anti-slip strips help reduce the likelihood of slipping. Unlike smooth porcelain or fiberglass, these surfaces provide essential traction even when wet.

3. Flat-Bottomed Bathtubs

Most bathtubs have curved interiors that prevent shower chairs from staying planted firmly, and the curved walls can make exiting the tub difficult. Bathtubs that are designed with flat bottoms and less curvature to the inner walls make for a more comfortable and safer bath.

5. Built-In Grab Bars and Seating
Strategically placed grab bars are a simple yet effective safety addition. Positioning them at entry points, along walls, and near faucets provides support during transitions in and out of the tub or shower. Adding built-in or fold-down seating allows users to bathe without standing for long periods, further reducing fall risk.

5. Wider and More Spacious Layouts
A popular approach to renovating any room in the home is to maximize space. Whether this means knocking down walls or changing layouts, there’s never a disadvantage to more room. This goes for the tub and shower as well. Designing tubs and showers with extra width allows more room for movement and assistance. Spacious layouts can also accommodate transfer benches, shower chairs, or caregiver support when necessary.

Universal Design Principles

The safest bathrooms are those that apply universal design principles—creating spaces that are functional for everyone, regardless of age or ability. Features like lever-style handles, handheld showerheads, adjustable height fixtures, and ample lighting contribute to overall safety and ease of use. Importantly, these elements benefit not only older adults or people with disabilities but also families with young children and individuals recovering from injury.

Soaking it All In

Standard bathtubs, while traditional, are not designed with safety in mind. By considering safer alternatives such as walk-in tubs and slip-resistant materials, homeowners and designers can create bathrooms that prioritize accessibility without sacrificing style.

The bathroom should never be a place of fear—it should be a space for comfort, dignity, and independence. Thoughtful design choices can transform the dangers of standard tubs into opportunities for safer living.

How To Keep Seasonal Allergies Under Control

https://unsplash.com/photos/zosE9lAYQlo

When you have seasonal allergies, it’s difficult to enjoy the spring and summer seasons without some discomfort. In fact, many people struggle with the symptoms of seasonal allergies year after year, and they don’t know how to get relief from these symptoms other than taking medication that can sometimes be more disruptive than helpful. However, there are steps you can take to alleviate your symptoms and enjoy these seasons more fully. This article will help you find the best ways to keep seasonal allergies under control so you can feel better and perform at your best.

Learn the Triggers

The most effective way to manage your allergies is by learning to avoid your triggers. For example, pollen and pet dander are both common triggers for seasonal allergies. If you have a pet, be sure to keep him or her out of your bedroom at night. It’s also a good idea to purchase a high-quality air purifier that can remove dust and pollen from your home.

Establish Good Sleeping Habits

A number of studies have linked poor sleep with increased production of allergy-related chemicals in your body. These include histamine, which helps protect against infection but is also a component of allergy symptoms; cytokines, which are a class of proteins involved in immune responses; and leukotrienes, which help regulate inflammation. If you’re having trouble sleeping at night because you’re suffering from seasonal allergies, make sure to establish good sleep habits by setting a regular bedtime and sticking to it. You can also take supplements like melatonin or try relaxation techniques that may encourage sleep.

Use an Air Purifier

When you’re dealing with allergies, it can be difficult to know what you should and shouldn’t do. Take steps to keep your living spaces clean by using an air purifier for your home that removes allergens and irritants from the air. These machines are able to remove pet dander, mold spores, pollen, dust mites, and even smoke from your home so you can spend time there without having reactions to those substances. Using one of these machines could help you feel better during allergy season without having to compromise your family’s lifestyle. Most households only need a small air purifier in one room of their house, but some may need more depending on how much time they spend at home and the size of their living space.

Don’t Put Off Going to See Your Doctor

The first-hand consultation with a doctor is an important step in figuring out how to manage your allergies. By laying out symptoms and undergoing a physical examination, your doctor can confirm or rule out various causes of your reaction. If you suspect you’re suffering from seasonal allergies, head to an allergist right away—don’t wait until symptoms have reached their peak. According to research, patients who received treatment for their seasonal allergies within two weeks had less severe symptoms than those who waited longer. The sooner you get medical help, the sooner you can start finding relief!

Exercise Regularly

People with a history of allergies or asthma often benefit from regular physical activity. The result is improved lung function, stronger immune systems, and lower stress levels, which can make seasonal allergy sufferers feel better overall. Plus, when you exercise regularly your body gets better at fighting off allergens. A regular routine can also increase stamina and make allergy season less miserable. (Try exercising for 30 minutes four times a week.) If you’re not an active person but want to start working out more to deal with allergies, it’s important to talk to your doctor before taking on any new exercise routines—especially if you have respiratory issues that could be exacerbated by exercise-induced breathing problems.

Dust High Surfaces

When dust mites and mold spores settle on surfaces, they can often make allergies worse. Though you can’t see them, these tiny allergens can make a big difference in the way you feel. By doing a little everyday cleaning you’ll reduce the dust that collects on surfaces in your home, meaning less of them and more breathing room for you. Wipe down surfaces daily with a damp microfiber cloth and avoid using any harsh chemical cleaners or sprays around your home – they won’t do anything to kill allergens and they could actually cause other health problems (like respiratory issues) if you’re exposed over time. For surfaces you can’t reach easily, you can hire a professional service to do a high dusting of ceilings, vents, and other places where dust may settle. Remember: A clean house isn’t just cleaner; it’s also healthier too!

Other Solutions

Getting a little dusting of pollen is natural and inevitable, but if you have allergies, it’s a good idea to take precautions. For example, when you head outside on those warm summer days, you might want to bring along an extra set of clothes so that you can change if your allergies start acting up. You may also want to consider sitting indoors in air-conditioning for a bit before going back outside. Keep in mind that many allergy medications don’t work well unless they’re taken one or two hours before exposure. Other options include: wearing masks (there are many varieties available) or taking antihistamines and corticosteroids.

How To Properly Secure Your Digital Assets

Image Source: Unsplash

https://unsplash.com/photos/hpjSkU2UYSU

Every year, our world and the technology we use continues to evolve, so much so that most of what we do is now done on a computer or smartphone. While tech can make life more convenient, it also means that you have more digital assets than ever before — if you aren’t careful, those assets can be quickly stolen by hackers and cybercriminals.

It may not be fun to think about, but you need to secure your computers, tablets, and smartphones now so you can protect yourself against malicious characters. To help, we will discuss some essential tips and information that you can use to safeguard your assets and data. Take care of it now, and you can protect yourself and your finances for years to come.

Your Digital Assets Are At Risk

Some people don’t bother to protect their unsecured data because they don’t feel that there is really a risk. However, by being negligent, you are making yourself a prime target. Studies show that cyberattacks occur, on average, every 39 seconds, and they can happen to businesses and individuals alike. It may not seem like a big deal, but hacking can have disastrous results for you, both personally and financially. It can even result in identity theft if you don’t take the proper precautions.

That is because every piece of data that you have online can be used for malicious purposes. While many of us realize that credit card information and Social Security numbers can be used to take out fraudulent loans and commit identity fraud, many don’t know that even phone numbers and email addresses can be sold on the black market or used to send scam emails.

Hackers can use many different tactics to try to get your data. If you ever leave your device unattended, someone could simply insert a USB drive and upload a virus. Even if you keep your computer at home, a hacker can still send a phishing email (a fake communication that appears to come from a trustworthy source, like your job or a store you like to shop at). When you open it and view the attachment, a virus is installed on your device. Criminals can even create fake alerts on your computer — like a warning that you have a virus — but when you click the button to “fix it”, malware is installed on your device.

The fact is that you need to be vigilant at all times, even when you think you are already protected. A good example is people who work from home. Although you may have an IT team at the office, if your personal device is infected and you send an email to your work account, the company can then get infected. That is why it is important to designate your home office a “work only” zone, where you separate your work and personal devices. Once you have that setup, then make it a point to keep a decluttered desktop where you keep all files in designated folders. That way, you won’t misplace your work, and you will know if a file has been compromised.

How To Secure Your Assets

Now that you know the importance of securing your digital assets, it is time to start putting the proper protections in place. The first step is to take your password security seriously. Your password should have a combination of letters, numbers, and special characters, and you should use a separate password for every system and website you use. You can combine your password with a form of two-factor authentication for additional protection

It is also important that you protect your entire system and disguise yourself from hackers by installing a virtual private network (VPN) on all of your devices. A VPN will hide your location and automatically encrypt your incoming and outgoing data, so even if a hacker was able to access your system, they couldn’t read your information. Using a VPN is especially important when you are working in public, where hackers love to hide.

Finally, it’s crucial to use an antivirus program installed on your computer and mobile devices. By having this software and running scans every week, you can ensure that any virus that does reach your computer is deleted immediately. Make sure to update your antivirus program often, so you are always protected against the newest threats.

Properly Disposing Of Old Files And Paperwork

Protecting your assets and data goes beyond the digital world.

These days, digital filing has become the norm as paper and filing cabinets become a thing of the past. This means it’s not uncommon for people to scan and upload their physical paperwork so they can file it on their computers to stay organized and save space in the office. However, while you are making a smart move, you need to be careful with the information you leave behind.

Once you have scanned and uploaded your physical paperwork, make sure to have that documentation properly shredded or disposed of. Do not simply throw out the full sheets because criminals are not opposed to going through your garbage.

When you are decluttering your computer and removing files you no longer need, remember that even though you press the delete button, it doesn’t mean that the file is gone forever. Hackers can still use special tools to recover those files if they get into your system. To ensure that the data is gone forever, you can install a wiping program to erase your hard drive.

If you plan to sell or give away your computer, then your best bet is to destroy the hard drive altogether. Your best is to bring it to a shredding center. They have the machinery necessary to ensure that the hard drive is properly processed and your data can never be accessed again.

As you can see, you must implement the proper protections today, or you could be hacked and your data exploited before you know it. Consider these tips and beware of common scams, and you can keep your assets, personal data, and sensitive information secure.

How To Prevent Flood Damage In Historic Homes


Historical homes provide a charming aesthetic, although they are more vulnerable to flood damage. Older structures often have minor cracks on the roof, walls or flooring, making the interior more susceptible to water accumulation. Here are tips to prevent flood damage in your home.

1. Evaluate Your Drainage System

The drain should be sloped away from your foundation. Redirect gutters so water flows toward the street, preventing it from accumulating near your foundation. A build-up could lead to potential mold and a weakened structure.

In addition, clear out debris and leaves from the downspouts so moisture doesn’t build up. You can also install backwater valves to prevent water from entering your house.

2. Try Dry-Proofing Methods

Dry-proofing is where you seal your exterior to protect against floods. One method is adding flood shields to doors for better protection against heavy downpours. You can also raise the threshold of your entryway to prevent foundational issues. Be sure to seal around doors and windows tightly. Keep in mind older windows have larger openings to let in more light.

You can strengthen any masonry walls to withstand heavier pressure. However, if you ​​create a permanent installation, it must be compatible with the property’s historic character.

3. Decorate With Flood-Resistant Materials

Flood-resistant materials can withstand prolonged water exposure with little to no damage.

Make sure to add these to the underside of your home. Does your home need a renovation to create a more updated look? This is an excellent opportunity to add flood-resistant surfaces.

Here are a few materials to consider using:

  • Concrete
  • Clay tile
  • Brick
  • Pressure-treated (PT) resistant lumber
  • Polyester epoxy paint

Be sure to enclose any wall cracks with waterproof membranes or other sealants.

4. Raise Your Appliances and Utilities

Keep your appliances and HVAC system at taller heights whenever possible. Begin by determining your base flood elevation (BFE), which is how much the water level is anticipated to rise during an annual flood. This date is on the Federal Emergency Management Agency(FEMA) website. Make sure to raise your utilities above that level.

Be sure to elevate electrical wiring as well. This can prevent damage and potential electrocution. Also, turn off the home’s power systems if floodwaters rise.

5. Move Your Furniture Around

Take stock of your belongings and secure them as safely as you can to prevent potential water damage. Move high-value items to the upper levels. You can temporarily store a few things in your home’s attic. For example, do you have antique sofas or lamps you want to preserve during a period of rainy weather?

If you are accustomed to a storm season or rainy season, you should also be prepared to limit the furniture you keep outside. Taking in patio furniture, planters and other items for a few months can give you some peace of mind should flooding be a problem.

6. Have a Contractor on Hand

You want to restore your home as much as possible after flooding, especially historic homes with lots of charm. Have a trusted contractor on file and retain their number, which can help save time in an emergency.

Insurance companies will often work with general contractors during the claims process, which is why you must have somebody you can trust. Ask friends for references and research credentials before hiring someone. Make sure you interview multiple contractors as well.

7. Elevate Your Home

Raising your house on stilts or piers can protect against intense flooding by preventing water from seeping into your foundation. It also gives you time to move furniture around before the water level rises too high.

Contractors separate the frame and masonry veneer from their foundation during this process. Then they’re raised and kept up with temporary support. Finally, the new extended foundation is constructed below. Ensure you preserve the historical exterior features, such as wood siding. Also, check with local historical preservation societies to see if structural changes need approval.

8. Maintain Your Lawn Properly

A well-kept yard can elevate your home’s curb appeal and complement the charming exterior of older homes. You can use specific lawn care techniques to prevent flooding as well.

Use heavy soil with clay and sand so the surface runoff water empties into the street gutter. Also, leave plenty of room between your mulch and siding. Installing a rain barrel can help catch runoff water from the roof.


Tips to Keep Your Home Protected

Severe weather can be a problem for many homeowners, and preserving the beauty of a historical home is often a concern. Follow these steps to keep your property protected for years to come.

Author

 Evelyn Long is a Baltimore-based writer and the editor-in-chief of Renovated. She publishes home decor advice and product roundups for readers in spaces both big and small.

A DIY Guide To Cleaning Your Chimney

https://unsplash.com/photos/74GjpiGHEGA

Fireplaces bring old charm and cozy warmth to homes. These beautiful additions create a comforting ambiance, but they require a certain level of care—especially the chimney. Cleaning a fireplace is relatively easy, but effectively cleaning your chimney can be a big job.

It’s crucial to stay on top of your chimney’s cleanliness for optimal functioning and to prevent severe fire hazards. To effectively care for your chimney and your home, follow these steps.

Step 1: Determine if You Can DIY

Before you start, you first need to determine if you can clean your chimney without professional help. Chimney cleaning is a tedious task, and it can take professionals anywhere from 45 minutes to two hours to finish the job.

Your goal in chimney cleaning is to rid the chimney shaft of creosote and soot build-up. If the build-up is too large, you need to call a professional to take care of it. However, if you find the build-up is less than 1/8th of an inch deep, you may be able to tackle it on your own. In addition, you’ll need to access your chimney crown, located on your roof, to complete the job. If you’re unable to get to the crown safely, you’ll need to call in a professional to complete the task.

Step 2: Gather the Right Tools

If you determine you can safely access the chimney crown, you’ll need the right tools to get there. These include a ladder, safety harness, safety helmet, and an additional person or persons to supervise. Never attempt to work on your roof without the supervision of another capable individual.

Once on the roof, you’ll need a high-power flashlight, metal bristle brush, and enough rods to handle the height of your chimney. You’ll use these tools to determine the depth of your build-up. Note that each chimney is different, so you’ll need to measure the size of your chimney and its flue to get the right brush size.

https://unsplash.com/photos/k8YvyMzI200

Use your flashlight and a fireplace poker to scratch the smoke chamber and flue to determine the buildup. If the soot has a black matte finish and is 1/8th an inch deep or less, you know you’re okay to clean yourself. If you see a shiny or tar-like appearance or the build-up is more than 1/8th an inch deep, you should call a professional to take on the job.

Step 4: Set Up Your Area

If you are moving ahead with cleaning yourself, your next step is to protect your home’s interior. Lay your canvas tarp over the fireplace and spread it throughout the surrounding room. Secure the tarp over the fireplace opening with tape and insert the shop vac hose through the tarp. Seal everything with duct tape to keep soot from pushing into the room.

After setting up your shop vac outside, connect sections to the hose so it can reach. You’ll run the vacuum while you brush the area, keeping an eye on the filter and replacing or cleaning it when it clogs. Close the windows and doors near your shop vac to prevent any fine soot from reentering your home.

Step 5: Begin Cleaning

Start at your fireplace and ram your cleaning brush up and down several times around the flue section to remove any hardened soot. Use your flashlight to check your work before moving to the next section, ensuring you clean as much soot as possible from the flue area. Once cleared, start your shop vac and move to the roof.

Before cleaning, make sure you are safely equipped with your harness and have supervision from an individual on the ground. Again, you should only clean out your chimney with proper supervision, on a stable rooftop, and with a safety harness and a hard hat. Those without experience working on rooftops should strongly consider hiring a professional.

Once you are secured on the rooftop, add rods to your cleaning brush, moving it down the fireplace till you no longer feel resistance. At this point, you pushed down the soot to the smoke chamber. Climb down from the roof and start to work inside at the firebox. Use a long-handled brush to clean the smoke chamber and a flue brush to remove soot from the smoke shelf. Switch back to the long-handled brush to clean the sides of the firebox.

Vacuum out the firebox and fold up the canvas when you have cleared as much soot and debris as possible. Take the canvas outside and shake out any residue. Fold up the sheets to use again for your next cleaning.

Step 6: Schedule an Inspection

Your fireplace isn’t safe until you’ve scheduled your annual chimney inspection. Even the best DIY job can’t handle creosote build-up, and you need to be sure you didn’t miss any build-up during your cleaning. Have a chimney repair and cleaning professional inspect your chimney once a year to assure you don’t have additional build-up and or repair needs.