Halloween Candy Wrapper/Gift

Materials:

  • Cardstock
  • Sharpie® Fine-Tip Permanent Marker – Black
  • Raffia
  • Pencil
  • Aleene’s “Tacky” Glue®
  • Crayola® Blunt Tip Scissors
  • Hole Punch
  • Candy Bar

Instructions:

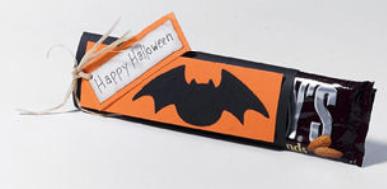
  1. Cut black cardstock to fit around candy bar. Cardstock should overlap about 1-inch. Glue cardstock to candy bar wrapper.
  2. Cut orange cardstock to 1½-inches x 5-inches or larger if needed. Glue to front of wrapper.
  3. Draw bat on black cardstock and cut out. Glue bat to orange cardstock.
  4. Cut one 1-inch x 2¾-inch orange rectangle. Cut one ¾-inch x 2½-inch white rectangle. Write Happy Halloween on the white rectangle and glue to the orange rectangle.
  5. Punch a hole in tag and through black cardstock. Thread raffia through both holes. Tie and trim raffia ends. Use glue to keep tag in place.

Halloween Scary Banner

Materials:

  • Creatology™ Foam Sheet – Black
  • Foam Shapes – Ghosts
  • Foam Stickers – Alphabet
  • Magnetic Specialty, Inc® Craft Magnets
  • Crayola® Blunt Tip Scissors
  • Crayola® Markers
Instructions:
  1. Cut banner from black foam.
  2. Decorate ghosts with markers as desired.
  3. Glue the ghosts and letters to the banner.
  4. Adhere a magnet strip to the back of the banner.

Halloween Photo Holder

Materials:

  • Creatology™ Wiggle Eyes
  • Sandpaper
  • Craft Smart® All Purpose Glue
  • Paper Plate
  • Paper Towels
  • Craft Smart® Paint Brush
  • Craft Smart® Acrylic Paint – Bright Blue
  • Craft Smart® Acrylic Paint – Citron
  • Creatology™ Craft Boa
  • 3M® Blue Painter’s Tape
  • Creatology™ Foam Sheet – White
  • Blunt Scissors
  • Pencil
  • Crayola® Markers
  • Lara’s Crafts® Roundhead Plugs
  • Unfinished Wood Photo Stand

Instructions:

  1. Sand photo stand until smooth. Wipe dust off with damp paper towel.
  2. Cut two small pieces of painter’s tape and wrap around base of wire photo holders.
  3. Paint photo stand and two roundhead plugs with two coats of Bright Blue, allowing paint to dry between coats. Peel off painter’s tape.
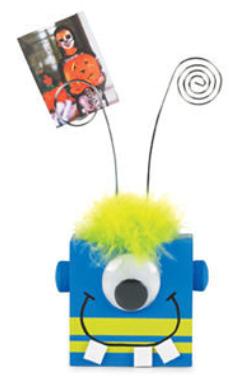
  4. Tape off lines as shown and paint two coats of Citron Green, allowing paint to dry between coats. Remove tape.
  5. Glue wiggle eye to top portion of block. Glue roundhead plugs to sides of block.
  6. Draw a smile lightly with pencil. Trace over with black marker.
  7. Cut out small foam squares for teeth and attach to face.
  8. Cut a 3-inch length of green boa and attach around the bases of the wire photo holders with glue.

Halloween Placemats

Materials Needed:

  • Creatology™ Foam Sheet – Yellow
  • Creatology™ Foam Sheet – Black
  • Creatology™ Foam Sheet – Purple
  • Creatology™ Foam Sheet – Green
  • Creatology™ Foam Sheet – White
  • Creatology™ Foam Sheet – Orange
  • Scissors
  • Ruler
  • Pencil
  • Craft Smart® All Purpose Glue
Instructions:
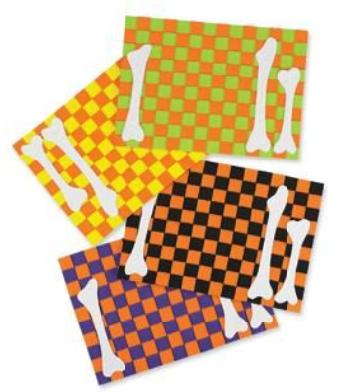
  1. Cut an orange piece of foam into 1” strips lengthwise. Set aside.
  2. Cut the black foam sheet into 1” strips width-wise (top to bottom). Lay the vertical strips side by side in front of you. Weave an orange strip horizontally through at the top of the black strips, and glue them all together. Allow to dry.
  3. Repeat step 2 until all the orange strips are in place. Apply glue only at the beginning and end of each strip. The final strip gets glued along the entire outside edge.
  4. Repeat steps 1 through 3 with the other colors of foam sheets. Be sure to always cut the orange sheets lengthwise, and the contrast color vertically.
  5. Trace 4 of each bone onto the white foam sheets, and cut out.
  6. Glue bone pieces onto placemats as seen in photo. They will go where the fork, knife and spoon go.

Halloween Tips For Little Ones Safety

!!!!!HAPPY SAFE HALLOWEEN!!!!! 

Planning For Trick-or-Treating

1 Choose costumes for your child that fit properly. Kids can easily trip and injure themselves if the costume drags on the ground.

2 Make sure all costumes are made of fire-retardant material.

3 Apply makeup instead of having the child wear a mask. If she insists on wearing a mask, make sure there are sufficient air holes around the nose/mouth and large openings for the eyes.

4 Look for  a costume with reflective pieces on them, especially on the back. You can also apply reflective tape to the costume yourself.

5 Arm your child with a flashlight and cell phone, so she can easily be spotted and reached.

6 Plan ahead and discuss with your child which routes you will take and where to meet if you get separated.

While You Are Trick-or-Treating

1 Make sure children, generally under 12 years old, are accompanied by an adult at all times.

2 Remind kids of importance of walking instead of running. Don’t allow kids to cut through yards or alleyways.

3 Teach children to only go to houses with a porch light shining and to never enter a stranger’s house under any circumstance.

4 Make certain kids know to walk on the left side of the road, facing oncoming traffic when sidewalks are not available.

5 Check all candy for possible tampering when you return home. Check for open wrappers and seals broken and discard these!

!!!!!HAPPY SAFE HALLOWEEN!!!!!