WHAT YOU NEED
From the supermarket:
• One package Knox plain gelatin
• 1/2 cup cornstarch
• Joy dishwashing liquid
• Six clean, empty 4-ounce baby food jars
• Food coloring From the kitchen:
• Two mixing bowls
• Spoon
• Measuring cup
• Pot From the tap:
• Water
WHAT TO DO
In a mixing bowl and using a spoon, mix the packet of powdered gelatin mix with V4 cup water until dissolved. Set aside.
In a pot, mix the cornstarch with 3A cup water. Add 2 cups hot water and mix well. Heat the pot on a stove, bring-
ing the mixture to a boil while stirring constantly. When the mixture becomes clear and thick (after one to two minutes), remove the pot from the heat. Pour in the gelatin mixture. Mix well, then pour equal amounts of the mixture into the six baby food jars. Add one drop of Joy dishwashing liquid to each jar.
In the first jar, add five drops of yellow food coloring and mix well. In the second jar, add five drops of red food coloring and mix well. In the third jar, add five drops of green food coloring and mix well. In the fourth jar, add five drops of blue food coloring and mix well. In the fifth jar, add four drops of yellow food coloring and one drop red food coloring, and mix well. In the sixth jar, add three drops red food coloring and two drops blue food coloring, and mix well. Let cool.
You’ve created finger paints that can be used on heavy white paper. To store, seal the lids on the jars.
If you like this post and want to share it then click the service!

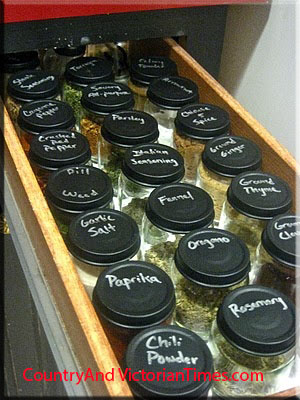 When you use contents of baby food jar clean completely and dry. Paint the lids with two layers of chalkboard paint. Now you can use a top drawer and have your spices more easily available to you. Don’t stop at spices – what about all of your findings, sewing notions etc.? Would be great for your excess office supplies too like paper clips, rubber bands, staples.