Thanksgiving Turkey Centerpiece

Materials:

  • Creatology™ Wiggle Eyes
  • Craft Smart® Acrylic Paint – Brown
  • Scissors
  • Craft Smart® All Purpose Glue
  • Paper Towels
  • Paper Plate
  • Felt
  • Wood Spoon
  • Craft Pumpkin
  • Feathers
  • Raffia
  • Paint Brush
Instructions:
  1. Paint wooden spoon brown, let dry.
  2. Adults Only: use end of scissors to make holes in the pumpkin for feathers. Then make a hole for the spoon in front of feather holes.
  3. Insert feathers into holes as shown.
  4. Cut beak and waddle from felt and glue to front of spoon as shown. Glue wiggle eyes to spoon.
  5. Insert spoon into pumpkin.
  6. Tie small raffia bow around neck of spoon.

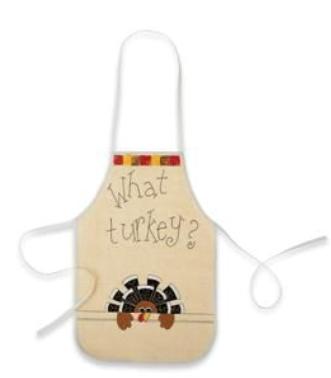
Thanksgiving Apron

Material List:

  • Americana® Acrylic Paint
  • Creatology™ Wiggle Eyes
  • Container of Water
  • Paper Plate
  • Paint Brush
  • Glue Gun (Adult Use Only)
  • Iron-on Transfer Paper
  • Sharpie® Fine-Tip Permanent Marker – Black
  • Iron
  • Paper Towels
  • Fabric Medium
  • Iron-On Transfer Pen
  • Child-Size Apron

Instructions:

  1. Trace patterns onto tracing paper. Flip design face down. Use Iron-on transfer pen to trace over reverse side of designs. Position design on apron ink-side down. Press over design with iron. Lift corner of paper to check for design transfer. Remove paper.
  2. Mix paint colors with Fabric Medium 2:1 on palette.
  3. Use Lamp Black to paint feathers.
  4. Use Titanium White to paint feather tips.
  5. Use Honey Brown to paint head and wings.
  6. Use Cadmium Yellow to paint beak. Let dry.
  7. Use Honey Brown to paint line work on feathers.
  8. Use marking pen to do lettering and outlining.
  9. Let dry 24-48 hours. Heat set: Place pressing cloth or brown paper bag over painted design. Set iron on temperature appropriate for fabric type. Press design for 30 seconds with iron. Follow label instructions for laundering information.
  10. Position and adhere wiggle eyes on face.

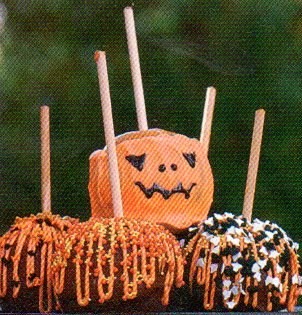
Candy Apples

CANDY APPLES

8 wooden craft sticks 8 medium Gala apples 2 (6.5-ounce) packages caramel apple
1 (16-ounce) chocolate bar 16 ounces vanilla bark coating Orange paste food coloring Toppings: colored sprinkles, chopped peanuts, black writing gel

INSERT craft sticks into apples. Cover each apple with 1 caramel wrap.

MICROWAVE at HIGH 15 to 20 seconds. Cool

MELT chocolate bar in a small saucepan over low heat.

DIP each apple into chocolate; let dry. MELT vanilla bark coating in a small saucepan over low heat; stir in orange food coloring.

DIP or drizzle each apple with vanilla coating mixture. Decorate with desired toppings, and let dry. Yield: 8 apples. Prep: 40 min.

NOTE: For testing purposes only, we used a Ghirardeili chocolate bar.

Meat Platter/Meat Head for Halloween

Ok, maybe a little gross, but a really eye catching food for all those Halloween enthusiasts.

In no way is there any kind of justification or morality for this kind of dish!  I only know that a cold cut bedecked skull upon a platter into the midst of a crowd of Halloween revelers chanting Meat Head. Meat Head. MEAT! HEAD! is to know what it is to touch the face of an angel.

Here’s how to make your own.

Supplies
– 1 plastic skull
– 1 box of red or green gelatin
– Cream cheese (optional)
– Food coloring (optional)
– Plastic wrap
– 1-2 cookie sheets
– 1 1/2 pounds thinly-sliced cold cuts
– 1 hard boiled egg
– Olives or cocktail onions
– Toothpicks

1. Wash a plastic skull. If it isn’t labeled as food safe, wrap it tightly in plastic wrap. Place this on the most decorative platter you possess.

2. Prepare a batch of gelatin, using HALF the amount of water suggested. Pour this onto a plastic wrap-lined cookie sheet to a depth of 1/4 inch, chill and let it congeal. Use a red-colored flavor for a gory look, or green if you should care to add an alien undertone to the festivities.

3. When the gelatin has set to a rubbery consistency, slice it into swatches and mold these around the skull. It may not be possible to thoroughly cover the entire head. You may also opt to augment coverage with cream cheese, stirred with the food coloring of your choice.

4. Layer the entire surface with thin slices of cold cuts. Deli ham can provide a smooth, only mildly-revolting skin, but salami and mortadella evoke a delightful soupçon of postmortem putrefaction.

5. Halve a hard boiled egg, then halve the yolk and press sides into the eye sockets. Pimento-stuffed olives or pickled cocktail onions make delightfully disturbing pupils. If you should care to amp the hue with beet juice or red food coloring, who in the world would stop you?

6. Augment the presentation by decking the platter with cooked, sauced spaghetti, meat scraps, pimento-topped hummus – however the spirit moves you.

7. Lower the lights, clear a space on the buffet table, and select thematically appropriate music for your ascension into Halloween host immortality as you introduce Meat Head to his adoring new fans.

Serve with forks and crackers. Most guests by then are whipped into a state of meat-adoring ecstasy and will simply lunge at Meat Head with their fingers, clawing off his flesh and stuffing it into their gaping maws, but you yourself may wish to maintain a sense of decorum. You’re not a savage, after all.

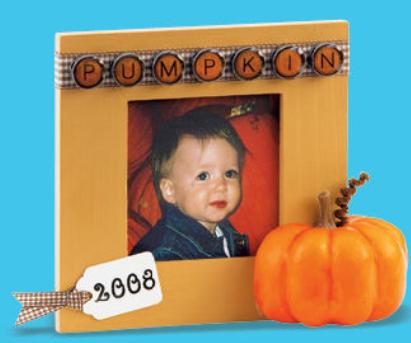
Fall Picture Frame

Materials:

aterial List

  • Wood Frame
  • Hirschberg Beads – White Round Alphabet
  • Craft Smart® Acrylic Paint – Brown
  • Ribbon of Choice
  • Foam Shape – Gift Tag
  • Hole Punch
  • Craft Pumpkin
  • Creatology™ Chenille Stem – Brown
  • Crayola® Markers
  • Blunt Scissors
  • Craft Smart® All Purpose Glue
  • Craft Smart® Paint Brush
  • Disposable Plate for Paint Palette
  • Container of Water
  • Paper Towels
  • Recycled Newspaper (to protect work surface)
Instructions:
  1. Paint the frame with brown and let dry.
  2. Glue ribbon around the top of the frame. Glue letters over ribbon to spell “Pumpkin” or other word of choice.
  3. Use a hole punch to punch a hole in the foam tag as shown. Tie a piece of ribbon through the hole. Use the marker to write the year on the tag.
  4. Glue the tag and the pumpkin to the frame. Coil the chenille stem around the paintbrush handle and glue to the pumpkin.